



Skip to content

Your cart is empty

Have an account? Log in to check out faster.

Continue shopping
RunCam Support

How can we help?

Quick answers about orders, delivery, warranty and using RunCam products.

Find support for your product

Select a product or series.

Browse help by topic

Choose a category to find the answers you need.

RunCam Support

Support Questions

Browse answers and troubleshooting guidance for this category.

TOPIC 01

Returns, Replacements & Warranty

Warranty assessment, returns and after-sales support.

How do I request warranty or return support?

Contact RunCam Support with your order number, product model, purchase channel and a clear description of the issue. Include photos or a short video when the problem is visual. Eligibility and next steps depend on the order, product condition, purchase channel and destination.

Submit a support request →
What information should I prepare for an after-sales request?

Prepare the order number, serial number when available, product name, purchase date, firmware version and troubleshooting steps already attempted. Do not send the product before receiving return instructions.

Which orders are eligible for a return?

This policy applies only to orders placed directly through the official RunCam Shopify store.

Products purchased from other online platforms, marketplaces, resellers, or distributors are not covered by this return process. In such cases, the customer should contact the original seller directly regarding returns or refunds.

How long do I have to request a return?

A return request must be submitted within 30 days of delivery .

For more information about return eligibility and applicable after-sales coverage, please refer to the After-sales Service Policy .

How do I request a return and how long does review take?

A customer may submit a return request in either of the following ways:

  • Submit a return request through the customer account on the RunCam website; or
  • Contact RunCam at run@runcam.com .

To assist with the review process, the customer should provide:

  • Order number;
  • Email address used when placing the order;
  • Reason for the return;
  • Photos showing damage or product issues, if applicable.

All return requests are reviewed manually by RunCam.

Except during public holidays, RunCam will normally review a return request within 2 business days .

Once the return request has been reviewed and approved, the return process may begin. For detailed return instructions and applicable conditions, please refer to the Return section of the After-sales Service Policy .

When will I receive a refund for a returned order?

Refunds will be issued to the original payment method used for the order.

After the returned package has been received by RunCam, the refund will normally be initiated within 2 business days , subject to inspection and confirmation that the return meets the agreed return conditions.

After the refund has been initiated, it may take approximately 2–5 business days for the funds to appear in the customer’s account. The actual processing time depends on the customer’s card issuer, bank, PayPal, or other payment provider.

TOPIC 02

Product Troubleshooting

Setup, firmware, features and product troubleshooting.

What to do if ScopeCam 2 4K could not be turned on after updating firmware?

If ScopeCam 2 4K seems bricked after updating firmware, please try to solve it by referring to the following steps:

  1. Format the used micro-SD card to exFAT or FAT 32 (Samsung U3 card highly recommended) Samsung_recommended_card.png
  2. Download and copy the SC024K.BRN file to card directly, without putting it into any folder
  3. Charge the camera for at least half an hour (green led should be on)
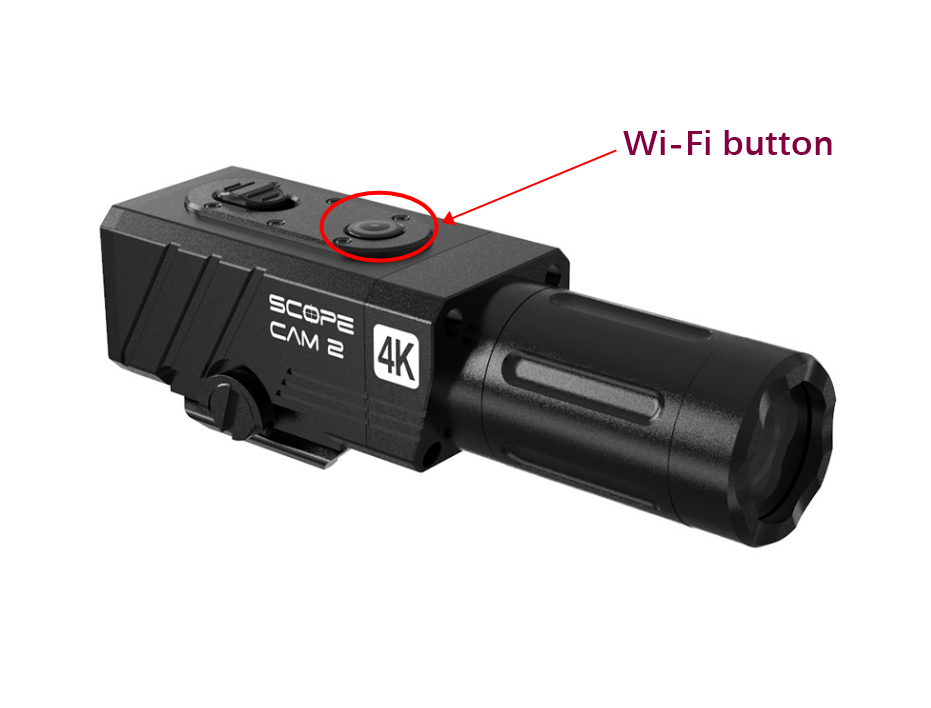
  4. With SD card inserted, power the camera via USB cable and a mobile charger, long pressing the Wi-Fi button for about 20 seconds till it gets turned on

SC24K_WIFIBUTTON.png

How to use the flashback cable of ScopeCam 2 4K?

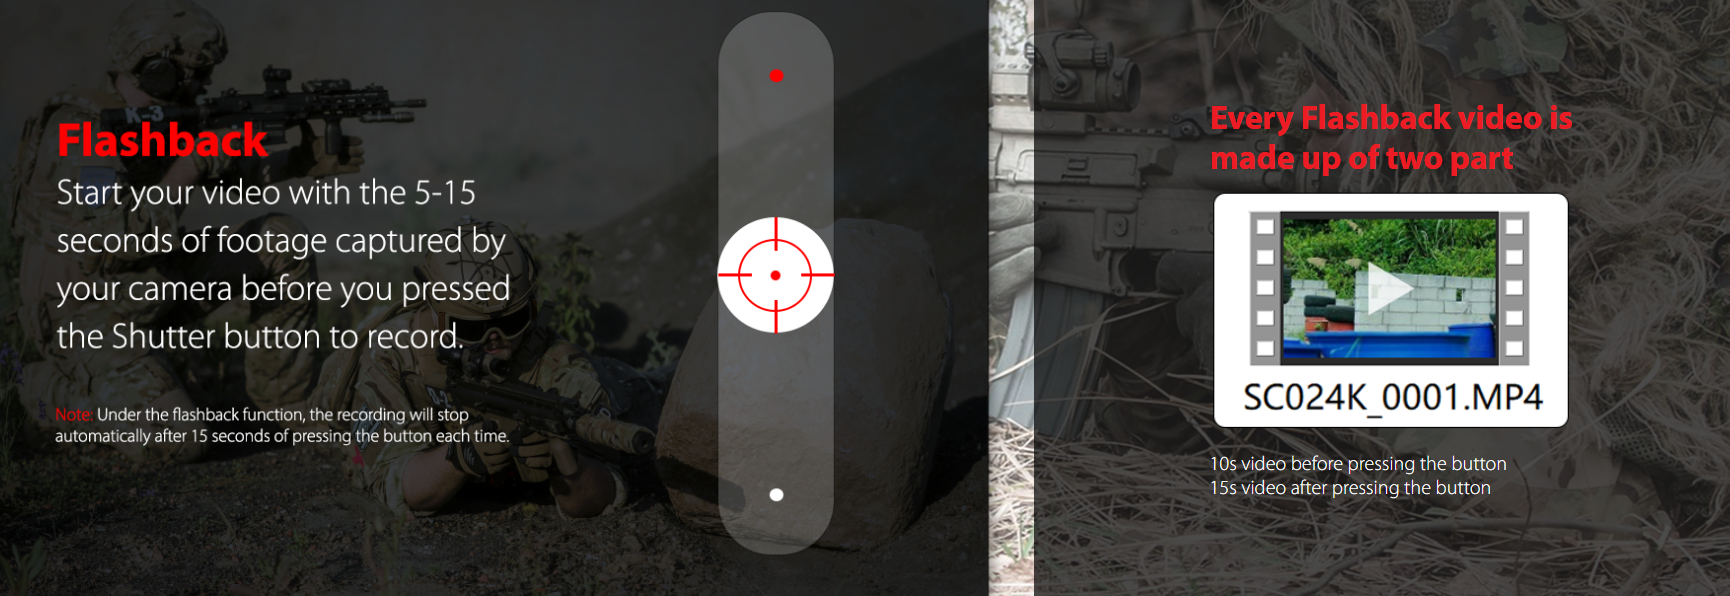
ScopeCam 2 4K has the flashback function, and using the flashback cable could help shoot moments. 1.png

It could be regarded as a capturing function, and this article is telling how to capture via using the flashback cable.

Note: Flashback function is only available when using the flashback cable to control.

To have flashback videos, there are 2 things to be confirmed before shooting:

1.Firmware of Camera

Please make sure that the firmware of ScopeCam 2 4K is at least V1.0.6 . Otherwise, the camera will not record the flashback videos.

Note: Latest firmware version is V1.1.0 (updated in 2025)

Here is the link for updating firmware via SD card. Please make sure the firmware file is to be copied to the SD card directly without being put into any folder or changed the file name. Camera will detect the firmware for updating automatically.

https://www.runcam.com/download/scopecam24k

2.Flashback function

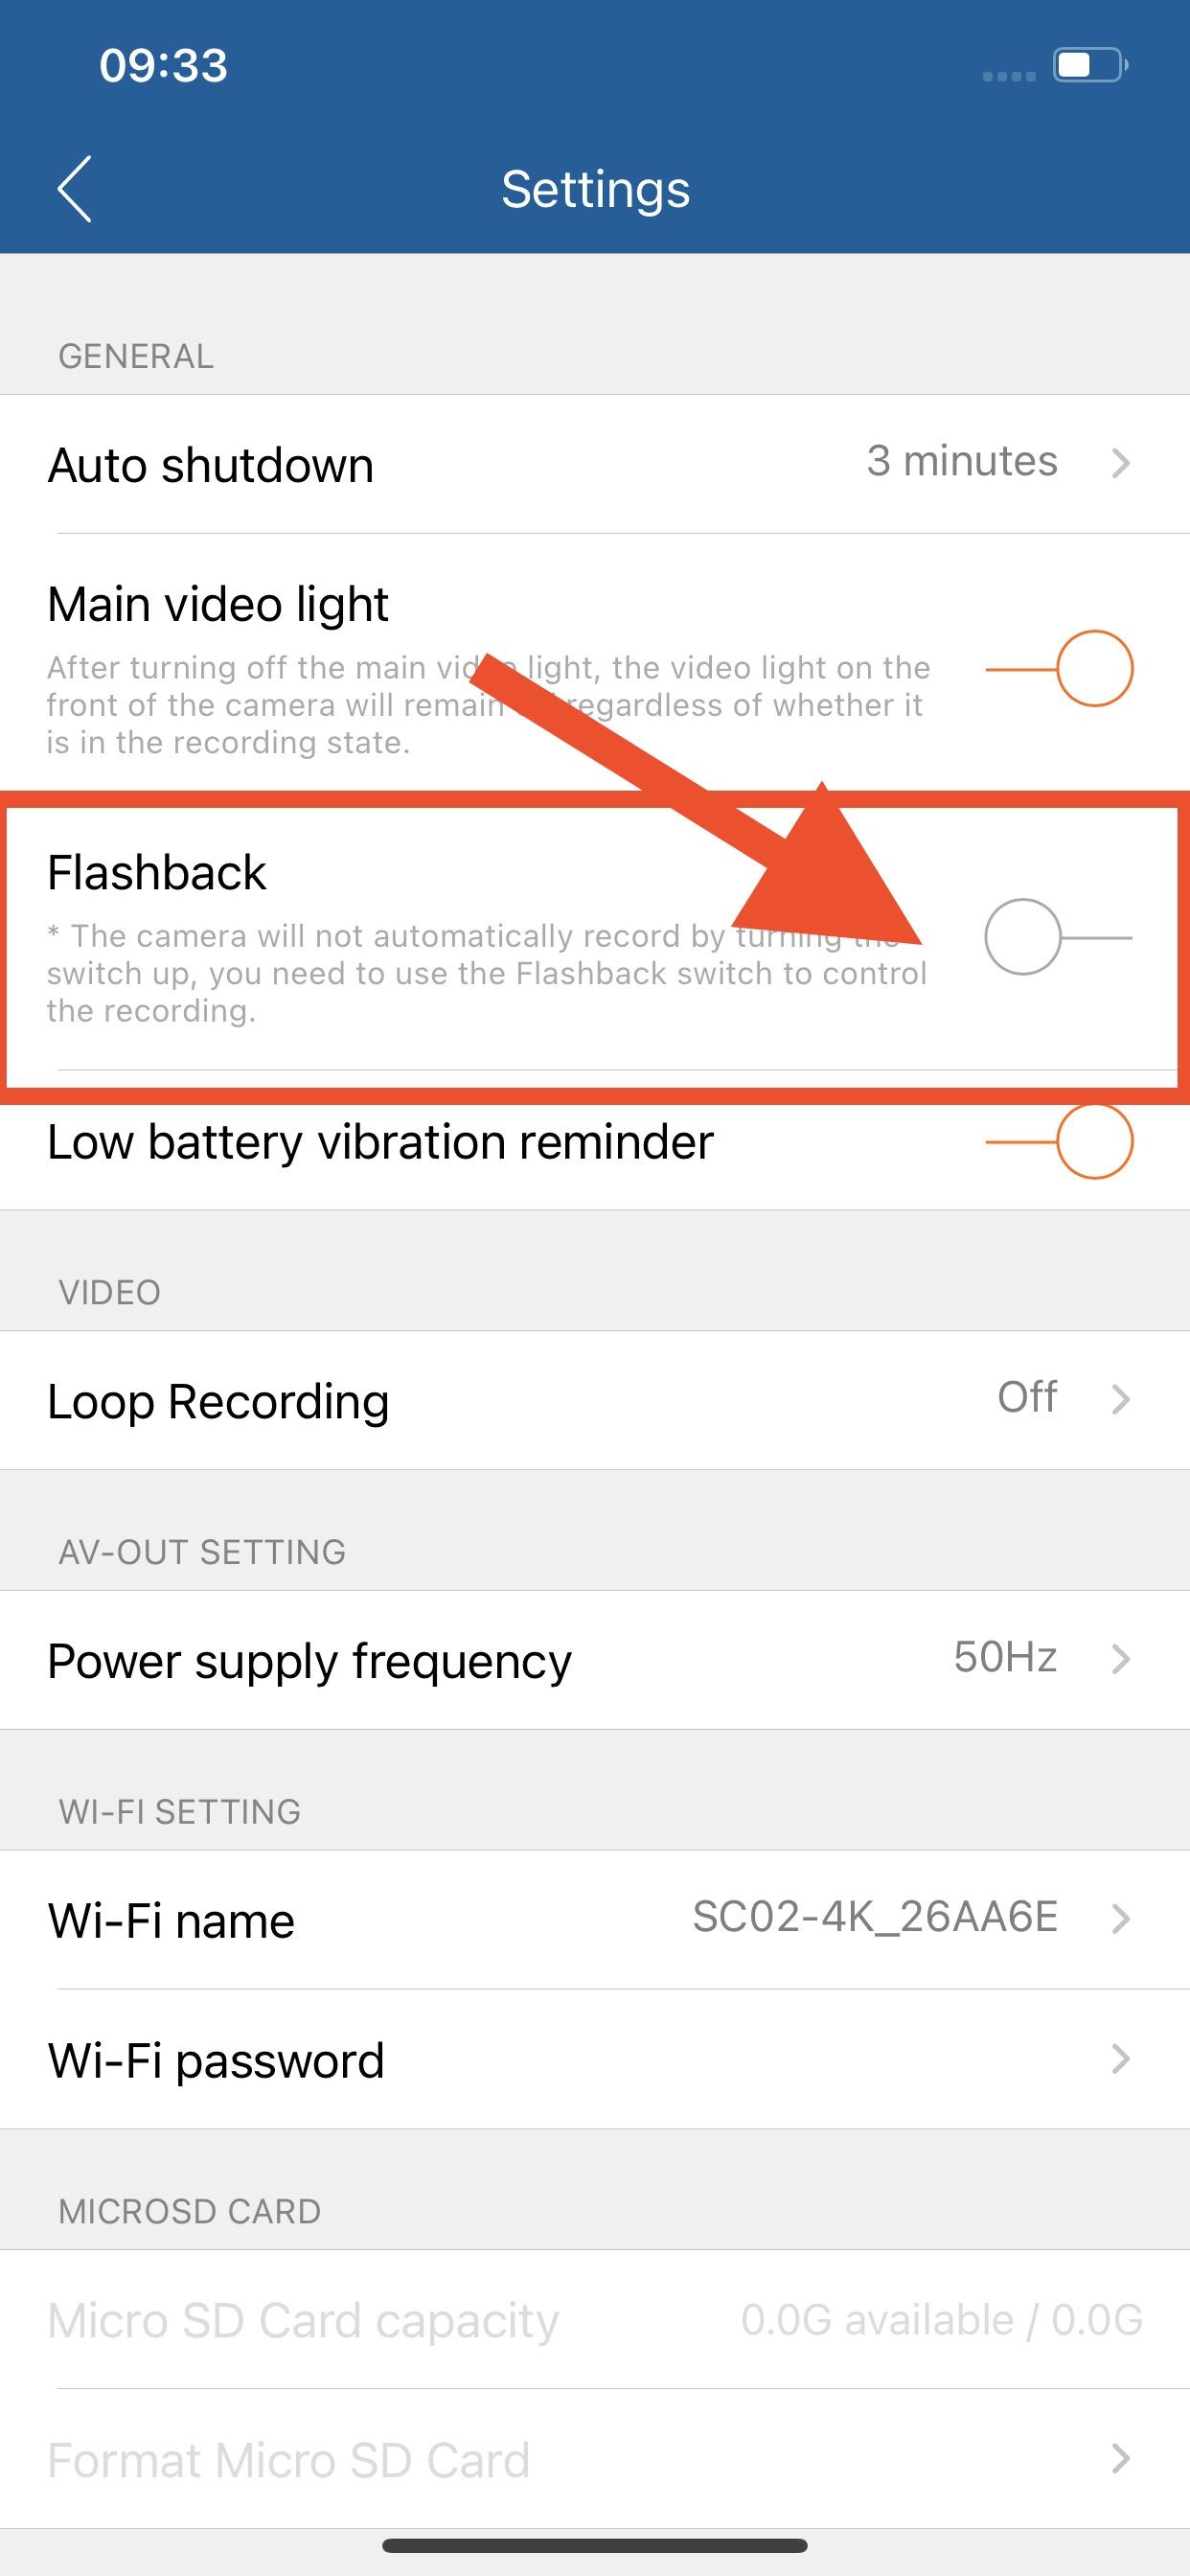
The Flashback function needs to be turned on before using because it is turned off by default.

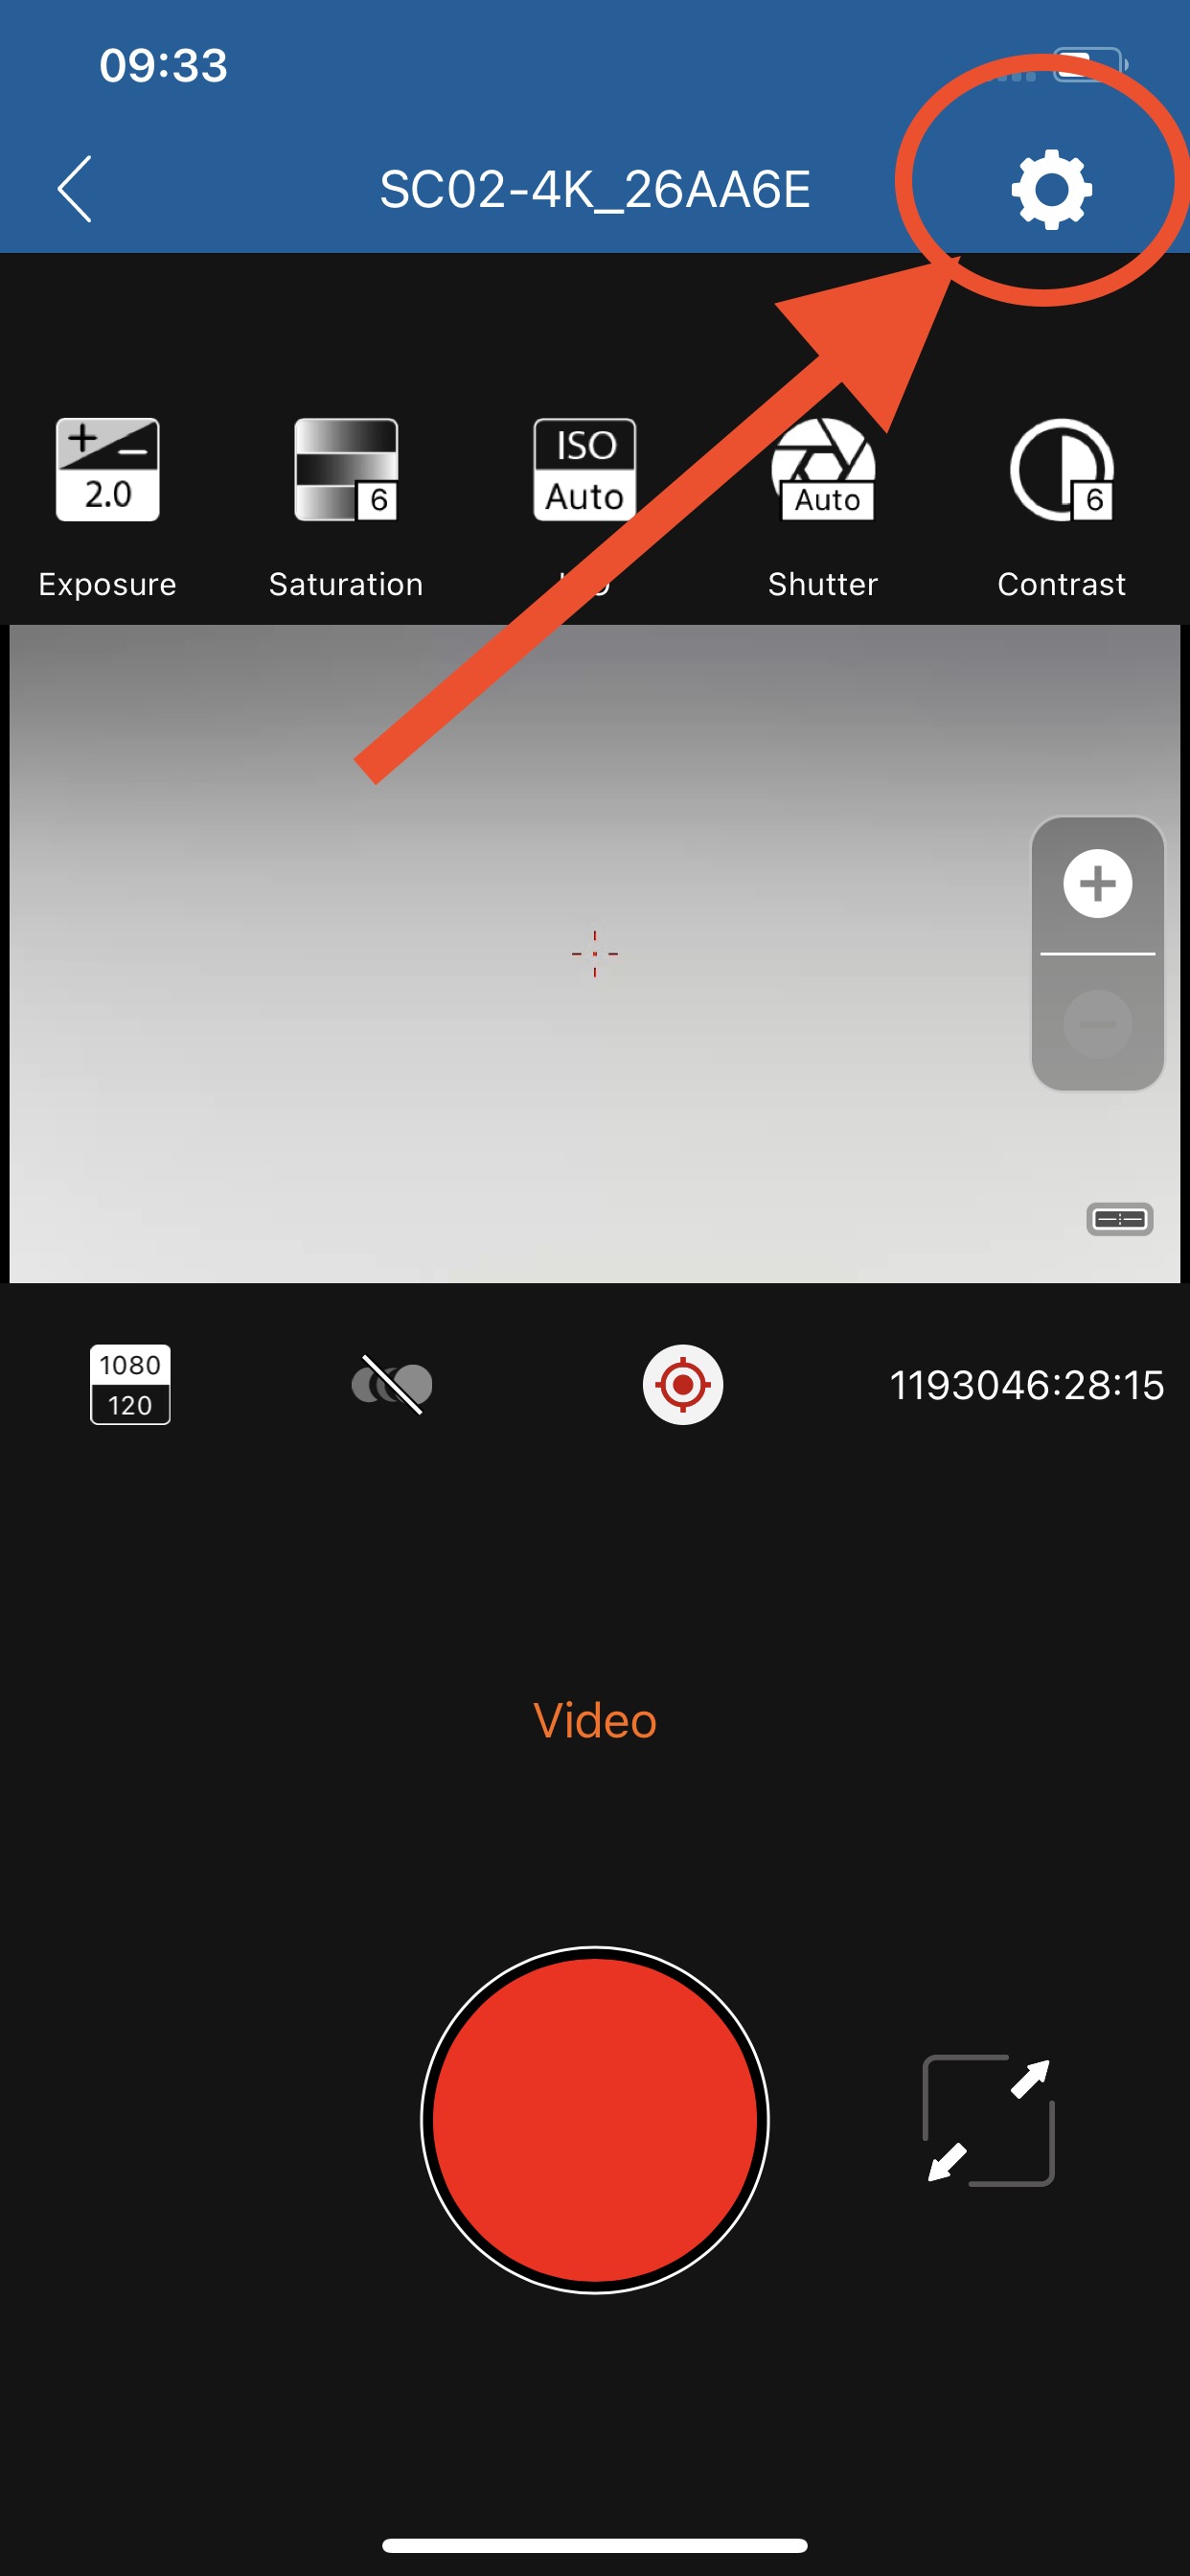
For turning on, connecting the camera to RunCam App via Wi-Fi, and then go to detailed settings to turn on the flashback function.

2.png 1.PNG 2.PNG

For moment capturing, the flashback video contains 2 parts: one part is recorded before pressing the button of cable, and the other part is recorded after pressing.

Here are the details of recording time for flashback videos:

Resolution 1080P@50FPS 1080P@60FPS 1080P@100FPS 1080P@120FPS 2.7K@60FPS 4K@30FPS
Former recording time 15 seconds 15 seconds 10 seconds 10 seconds 5 seconds 3 seconds
Latter recording time 15 seconds 15 seconds 15 seconds 15 seconds 15 seconds 15 seconds
Total recording time 30 seconds 30 seconds 25 seconds 25 seconds 20 seconds 18 seconds

When the flashback function is turned on via RunCam App, you need to select a proper resolution. After powering on ScopeCam 2 4K, camera won't start recording by default, and please use the flashback cable with the camera. Press the button on the flashback cable, the camera will start recording.

Without turning on flashback function, the flashback-cable could be used as a switch to control recording. It means that user could start and stop recording at any time by pressing the button of flashback cable.

What to do if ScopeCam 2/ScopeCam 2 4K only has a solid red light with vibration after powering on?

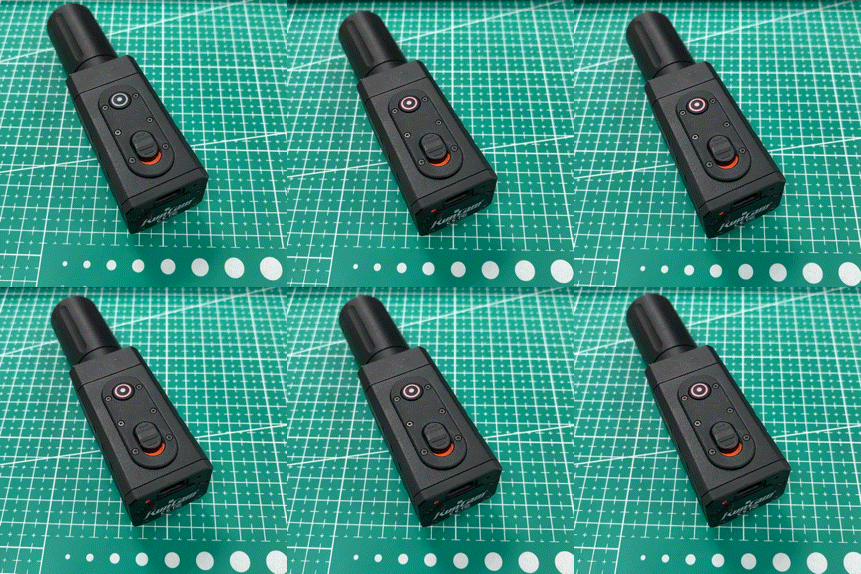
With a microSD card inserted in, ScopeCam 2/ScopeCam 2 4K will record normally after powering on, and the light on both Wi-Fi button and charging indicator will be slowly blinking red.

If the camera doesn't record after powering on, and it only has solid red lights on both Wi-Fi button and charging indicator, please follow the steps below to check and solve the problem.

(Notice: the light on Wi-Fi button may be fast flashing purple after staying on red for a while)

gif.GIF

It is possible for the camera to respond abnormally when it has a program error, or it cannot detect a lens module, and we recommend checking the connecting cable inside.

Here are the steps to reset the camera:

(1) slide the switch to "off"

(2) long press the Wi-Fi button only to power off the camera

(3) long press the Wi-Fi button again to power on the camera

Please check if the response of camera differs after resetting.

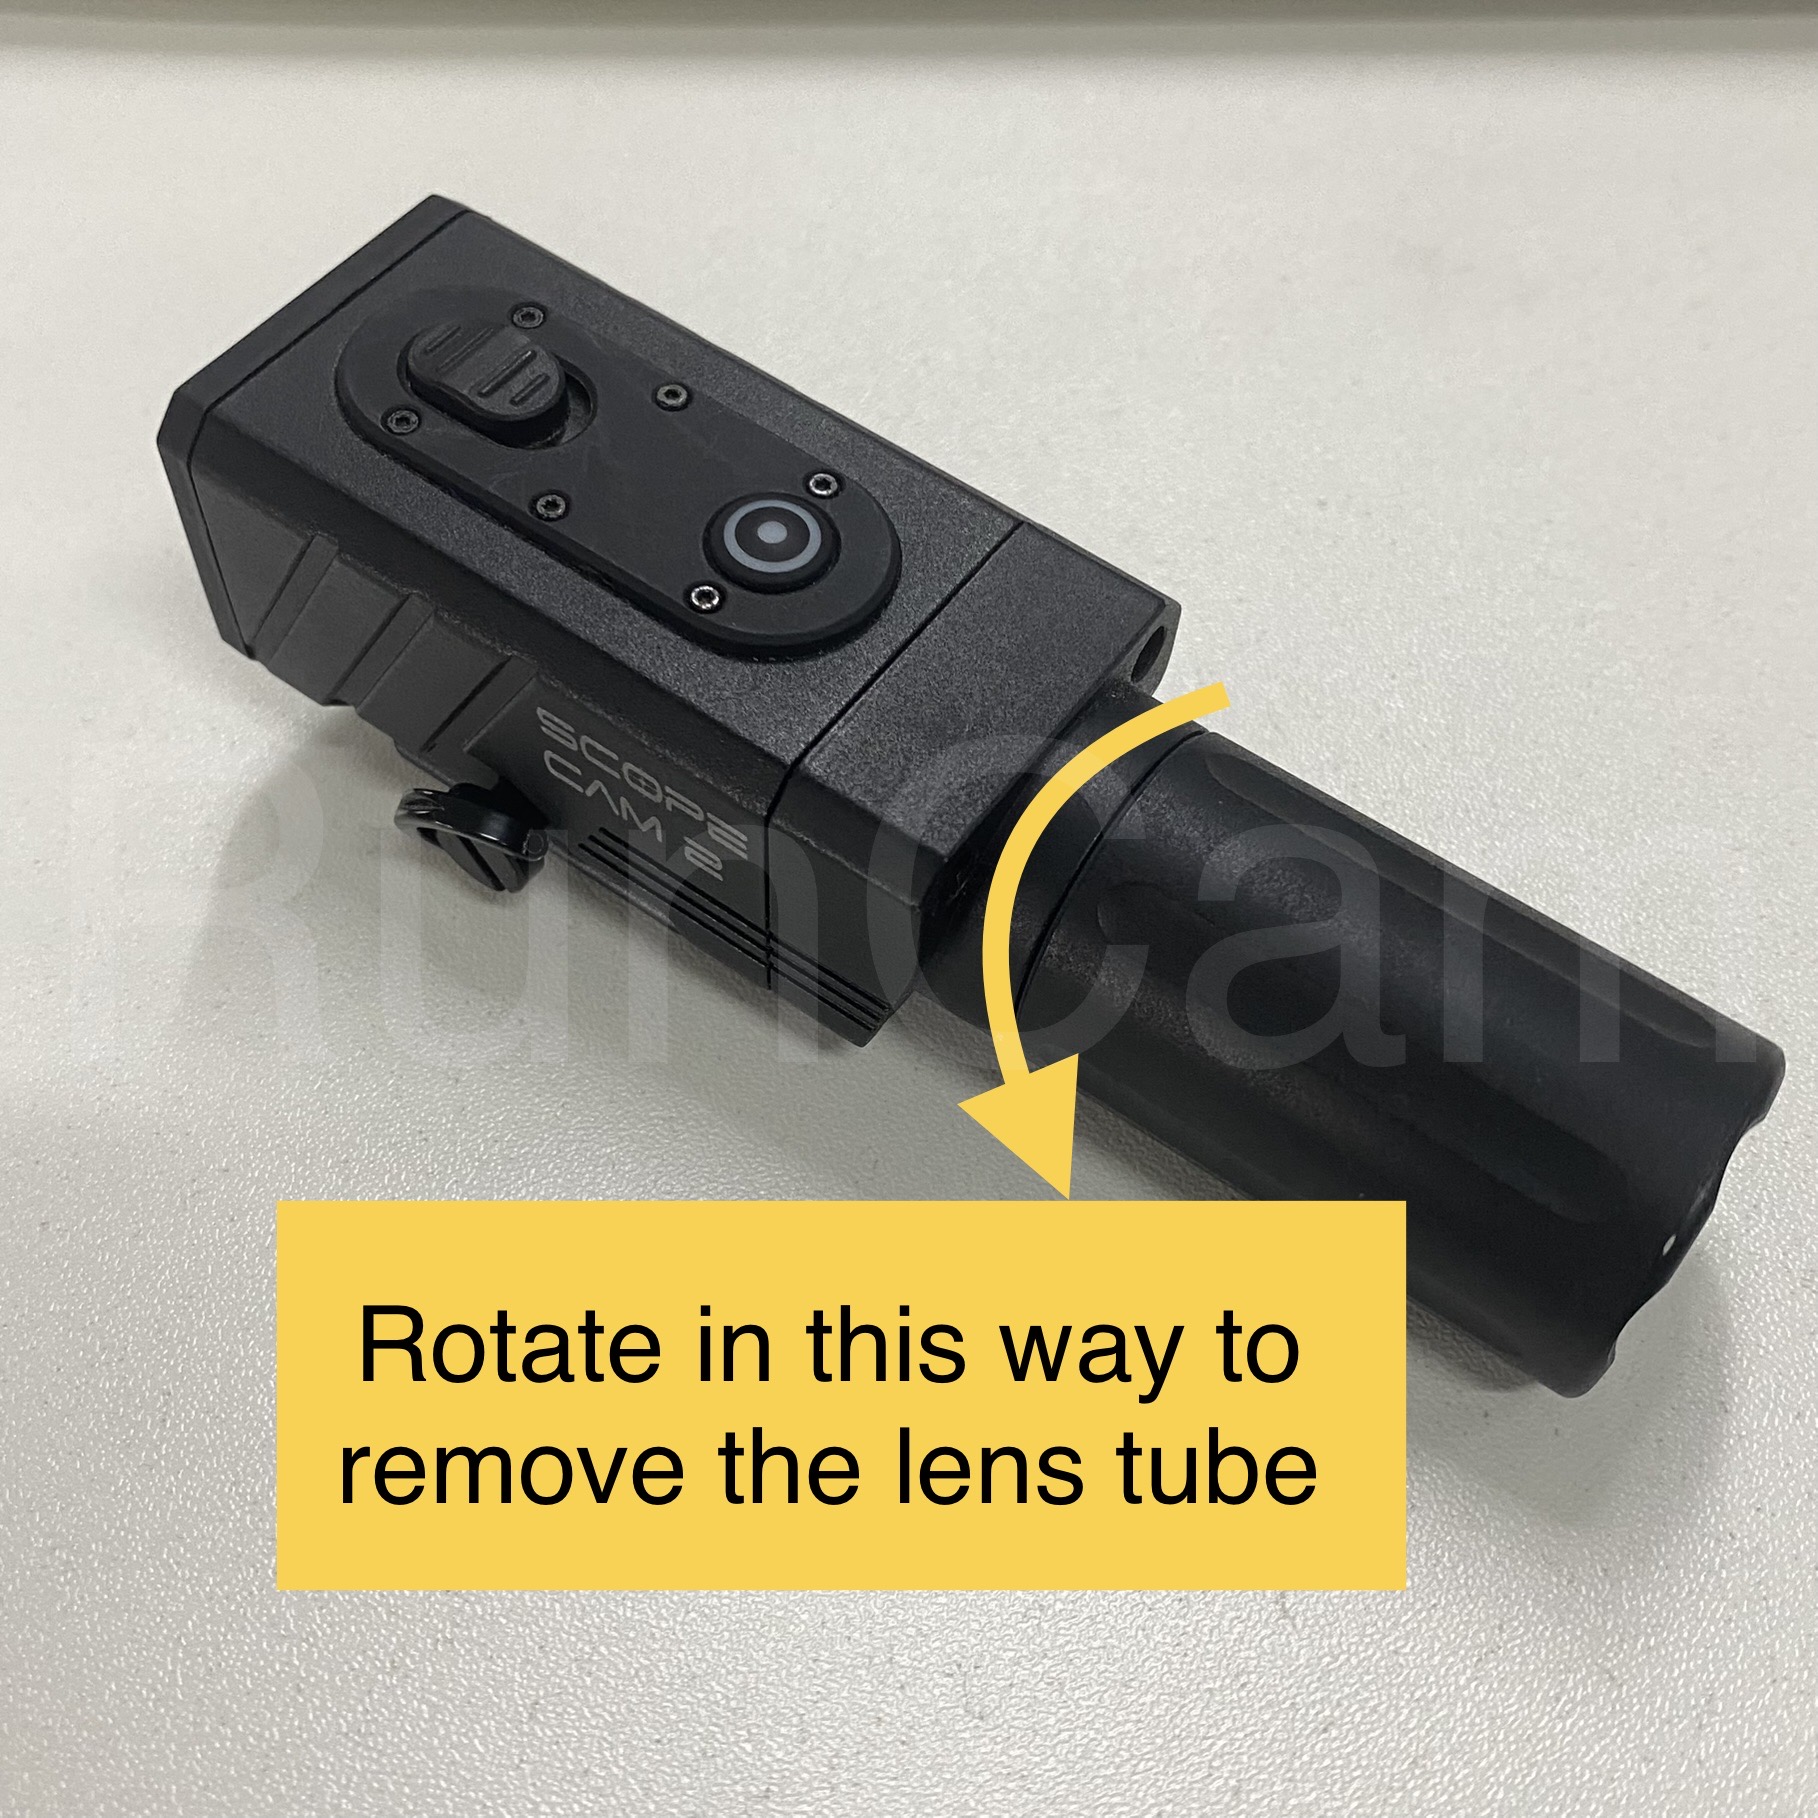
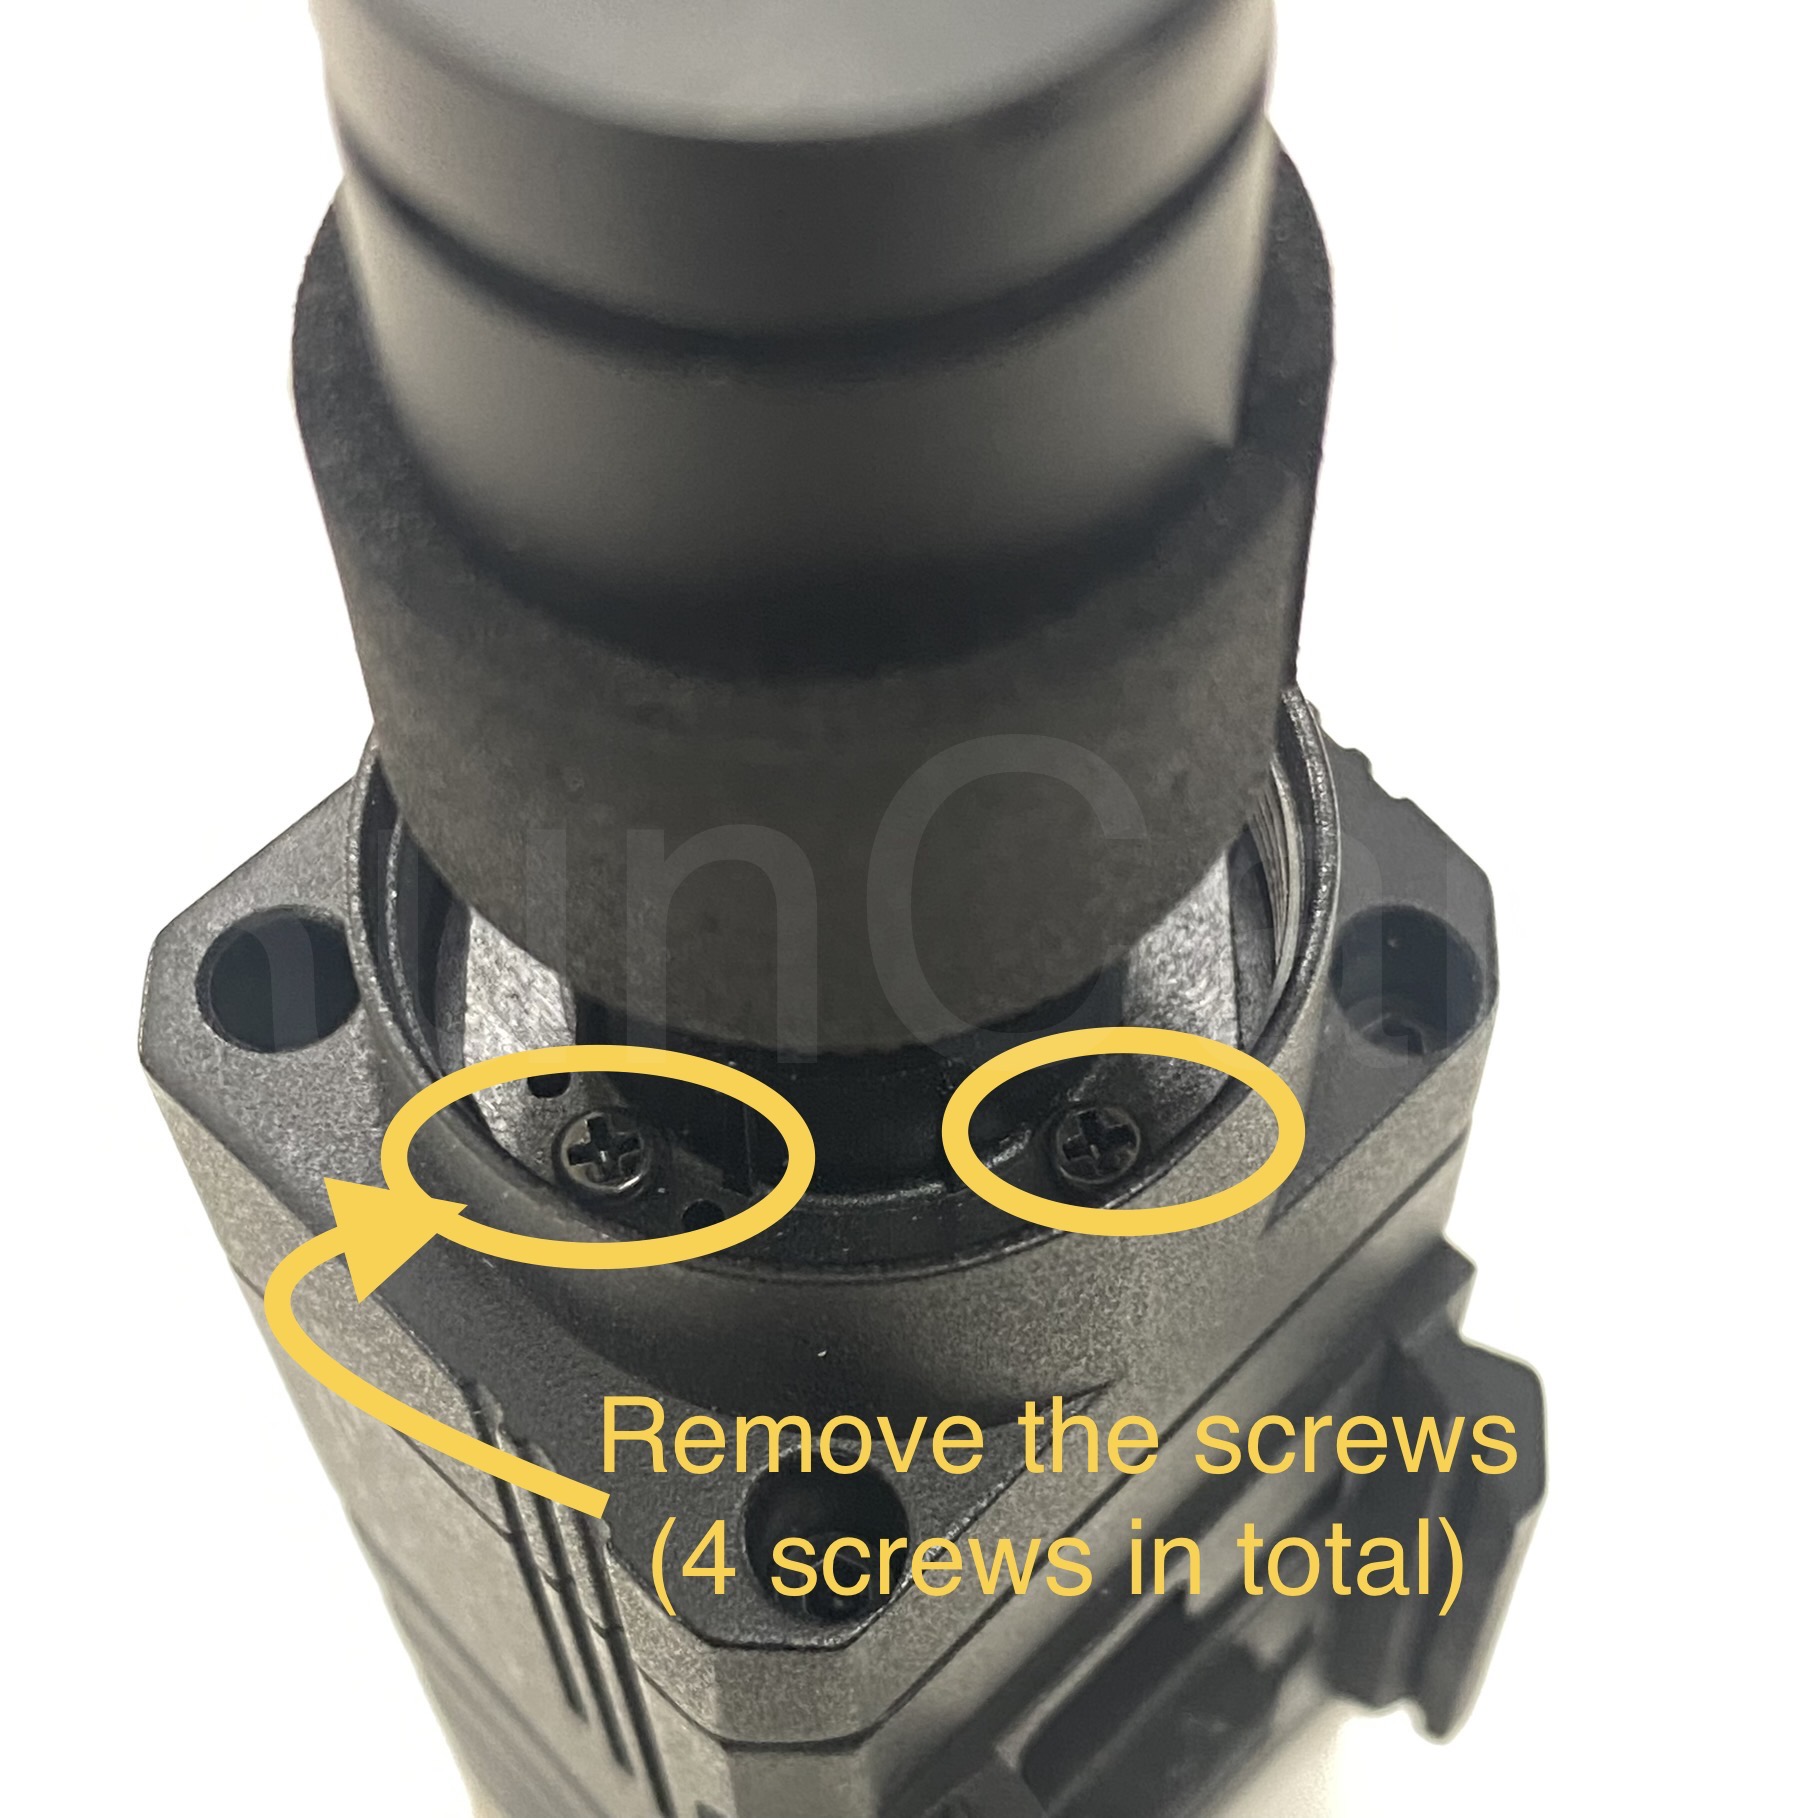
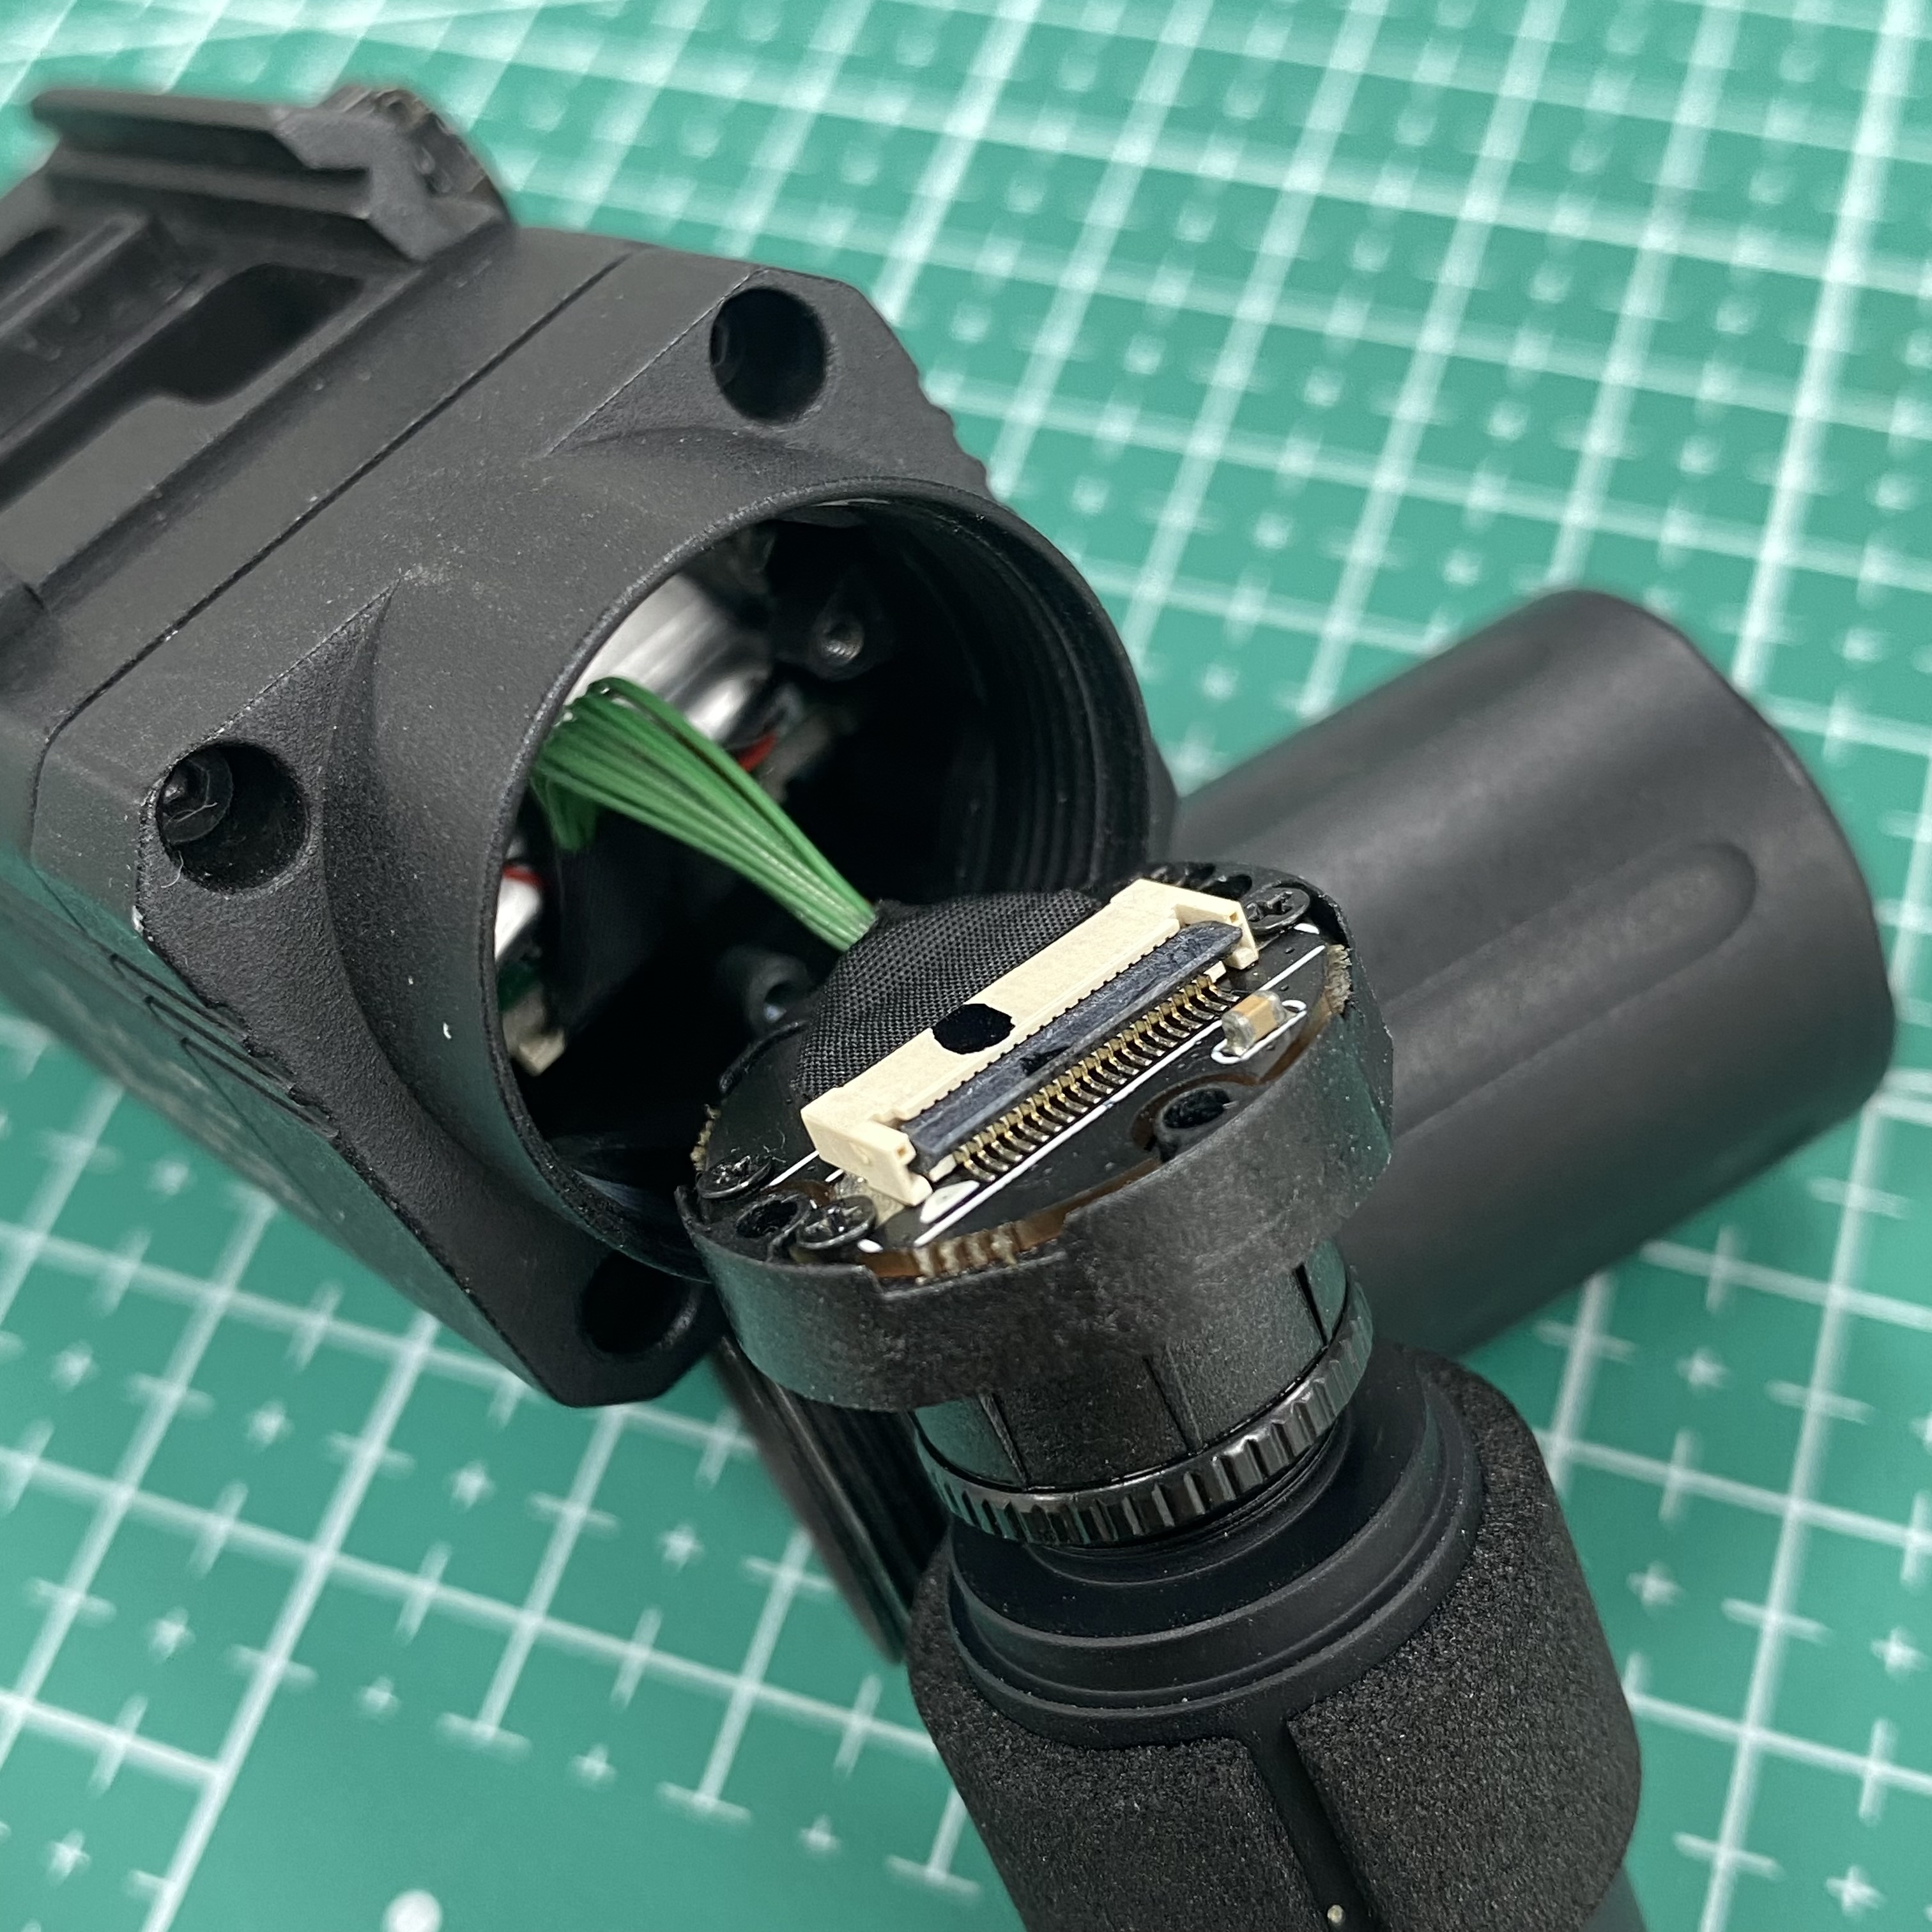
Here are the steps to check the lens module:

(1) remove the outer lens tube/casing

Check the lens Pic1.JPG

(2) remove the screws around the lens (4 in total)

Check Sensor Pic 1.JPG

(3) check the connecting cable inside to see if it gets connected properly, and check if each wire looks good

IMG_9328.heic.JPG

If the cable gets damaged, you can reach out to our product support to purchase a cable replacement.

Email: run@runcam.com

PRODUCT FAQ

WiFiLink 2

Recording, streaming, OSD setup and output-power guidance for WiFiLink 2.

How to use WiFiLink 2 to record?

WiFiLink 2 supports both onboard recording (to a microSD card) and mobile recording (via an Android phone).

Steps to enable onboard recording:

(1) Insert a microSD card to WiFiLink 2, and power on the unit. After powering on, there will be a user.ini file generated in 15 to 20 seconds.

(2) Remove the card, access it on a computer, and open the user.ini file. Locate the record setting.

(3) Change the value to true , save the file, and reinsert the microSD card into WiFiLink 2.

(4) Power on WiFiLink 2 again, and it should start recording automatically.

Mobile recording:

When using an Android phone with PixelPilot , you can also record the video feed directly on your phone. Simply select the Recording option in the app, and the files will be saved on the phone.

How to Set Up WiFiLink 2 Streaming with the RunCam Fly App?

Streaming your video feed using the WiFiLink 2 and RunCam Fly app is simple with the right steps. This guide walks you through the entire setup process, from powering on your device to configuring the stream and display options.

Preparation:

● WiFiLink 2 (OpenIPC system)

● A smartphone or tablet with Wi-Fi capability (only Android supported)

● The RunCam Fly app installed
→ You can download it from our site or Google Play (Android).

RunCam Fly: https://www.runcam.com/runcamfly.html

Important:

● The WiFiLink 2 must be running the OpenIPC system. Streaming is not supported if WiFiLink 2 is running the RubyFPV system.

● For the best performance and compatibility, always keep the RunCam Fly app updated to the latest version.

Step-by-Step Guide
1. Power On the WiFiLink 2
Connect the WiFiLink 2 to a power source. Wait for the device to boot up completely

2. Open the RunCam Fly App
Launch the RunCam Fly app on your mobile device

3. Connect the USB Wi-Fi Adapter to Phone

Connect the USB Wi-Fi adapter to mobile phone via OTG cable

4. Enter App Settings
In RunCam Fly app, tap the gear icon in the top-right corner to enter the app’s settings menu

5. Access OpenIPC
Scroll down and tap "OpenIPC" to access the streaming configuration

6. Adjust Streaming Settings
Tap “Settings” in the OpenIPC menu, and select the corresponding channel based on the configuration file of WiFiLink 2. Tap “Save” to confirm the settings.

7. Choose Display Mode
Select your preferred display option:

Full-Screen Mode for immersive viewing

Floating Window Mode to view the stream while using other apps

Video guide: WiFiLink 2 Streaming Guide in RunCam Fly

How to set RTSP stream for WiFiLink 2?

Default firmware (RunCam OpenIPC) of WiFiLink 2 enables a RTSP feature, and player such as VLC and PotPlayer are supported.

Please use the included RJ45 to 4Pin cable to connect the camera to a computer, and execute a player to open URL:

rtsp://root:12345@192.168.1.10/stream=0

If there isn’t a video feed available, please check the steps below to solve.

1. Connect the camera to a computer or a laptop via the RJ45 to 4Pin cable, and set the IP address for WiFiLink as 192.168.1.10

2. Access the WiFiLink via SHH (Software like PuTTY is recommended;

login as: root, password: 12345), ssh root@192.168.1.10

3. Type in a command to change the stream address:

cli -s .outgoing.server udp://192.168.1.10:5600

4. Then type in “reboot” to continue

image.png

5. Use a player like VLC or PotPlayer to open URL:

rtsp://root:12345@192.168.1.10/stream=0

(please use the same method if you would like to change the address back, and the command will be cli -s .outgoing.server udp://127.0.0.1:5600)

image.png
image.png
image.png

Note: the player tool used might effect the delay. Please consider changing another player tool like PotPlayer, and adjusting the buffer/cache settings to see if it improves the delay.

How to enable WiFiLink 2 OSD? (Betaflight)

BetaFlight Firmware – MSP OSD
1. Change the osd setting for WiFiLink 2 (via user.ini)
Insert a microSD card to WiFiLink 2, and power on the unit. After powering on, there will be a user.ini file
generated in 15 to 20 seconds.
Access the microSD card via a computer or laptop, and open the user.ini file on computer, locate the setting for osd.

Edit it to msp, save the settings after editing, and insert the microSD card back to WiFiLink 2.

2. Configure the corresponding UART at the Ports
Connect WiFiLink 2 to flight controller, and please check the wire sequences, especially for a cross-connection on UART.
Power the flight controller and connect it to a computer or laptop, use BetaFlight for further configuration.
Locate the Ports, and turn on the corresponding UART for WiFiLink 2, set VTX (MSP+Displayport).
Save the settings and reboot.
Note: please update the version of Betaflight if there is no detailed setting available. It should be 4.4.1 or above.

3. After rebooting the flight controller, go to the OSD setting to enable the elements of OSD you need, please choose the format to be HD, and save the settings.

4. Re-power the flight controller and WiFiLink 2, there will be OSD displayed. The below picture is for reference.

If there is no OSD displayed after the above steps, please check if a cross-connection is done properly between WiFiLink 2 and flight
controller, make sure that the RX of FC is connected to TX of WiFiLink 2, while TX of FC is to RX of
the WiFiLink 2.
If there is text displayed like the picture below, the protocol setting in the user.ini of WiFiLink 2 isn’t changed to
msp, and please check Step 1 to try again.

How to enable WiFiLink 2 OSD? (iNAV)

INAV Firmware – MSP OSD
1. Change the osd setting for WiFiLink 2 (user.ini)

Insert a microSD card to WiFiLink 2, and power on the unit. After powering on, there will be a user.ini file generated in 15 to 20 seconds.
Access the microSD card via a computer or laptop, and open the user.ini file on computer, locate the setting for osd.

Edit it to msp.
Save the settings after editing, and insert the microSD card back to WiFiLink 2.

2. Configure the corresponding UART at the Ports

Connect WiFiLink 2 to flight controller, and please check the wire sequences for the power supply and UART.
Power the flight controller and connect it to a computer or laptop, using INAV for further configuration.
Locate the Ports, and turn on the corresponding UART for WiFiLink 2, set the peripherals to be MSP DisplayPort.
Save the settings and reboot.
Note: please update the version of INAV if there is no detailed setting available.

3. If there is no OSD displayed after the above settings, please check if WiFiLink 2 gets connected to the flight controller properly, and make sure that the RX of FC is connected to TX of WiFiLink 2, while TX of FC is to RX of the WiFiLink 2.

It is also recommended to check if the UART works normally, and please change another one to try again.

4. If the character positions appear abnormal, please adjust them on the OSD interface. The adjustable area is within the red box. You may also adjust the video format as needed.

How to remove the displayed text "Waiting for date on /dev/ttys2...” for the feed of WiFiLink 2?

WiFiLink 2 supports both msposd and mavlink protocols.

When the OSD mode in the user.ini file on the SD card is set to msp , the red text shown below will appear.

This message only appears if msposd fails to detect serial port data. In contrast, mavlink does not perform this check or display such warnings. This is the standard behavior of OpenIPC firmware when handling OSD data input.

To removed the red text, please edit the user.ini file and change the value of osd from msposd to mavlink .

After saving the changes, insert the microSD card back into the WiFiLink 2 and power it on again. The new settings should take effect.

What output power does WiFiLink 2 support?

When configuring WiFiLink 2, there are Available values as options.

The larger the value, the higher the power, and please refer to the table below for reference:

Value 20 25 30 35 40 45 50 55 58
dBm 16 20 22 24 26 27 28 28.5 29
mW 40 100 160 250 400 500 630 700 800
PRODUCT FAQ

ScopeCam 2S

Wi-Fi and RunCam App connection guidance for ScopeCam 2S.

How to connect ScopeCam 2S to RunCam App via Wi-Fi?

RunCam ScopeCam 2S supports Wi-Fi connectivity and can be connected to the RunCam App on mobile devices. Once connected, live preview and basic settings configuration for ScopeCam 2S will be available through the app.

Note: Ensure the latest version of the RunCam App is installed and that the app has permission to access the local network.

RunCam App.png

Download RunCam App

iOS - Download

Android - Download

Step 1: Power on ScopeCam 2S and enable Wi-Fi.

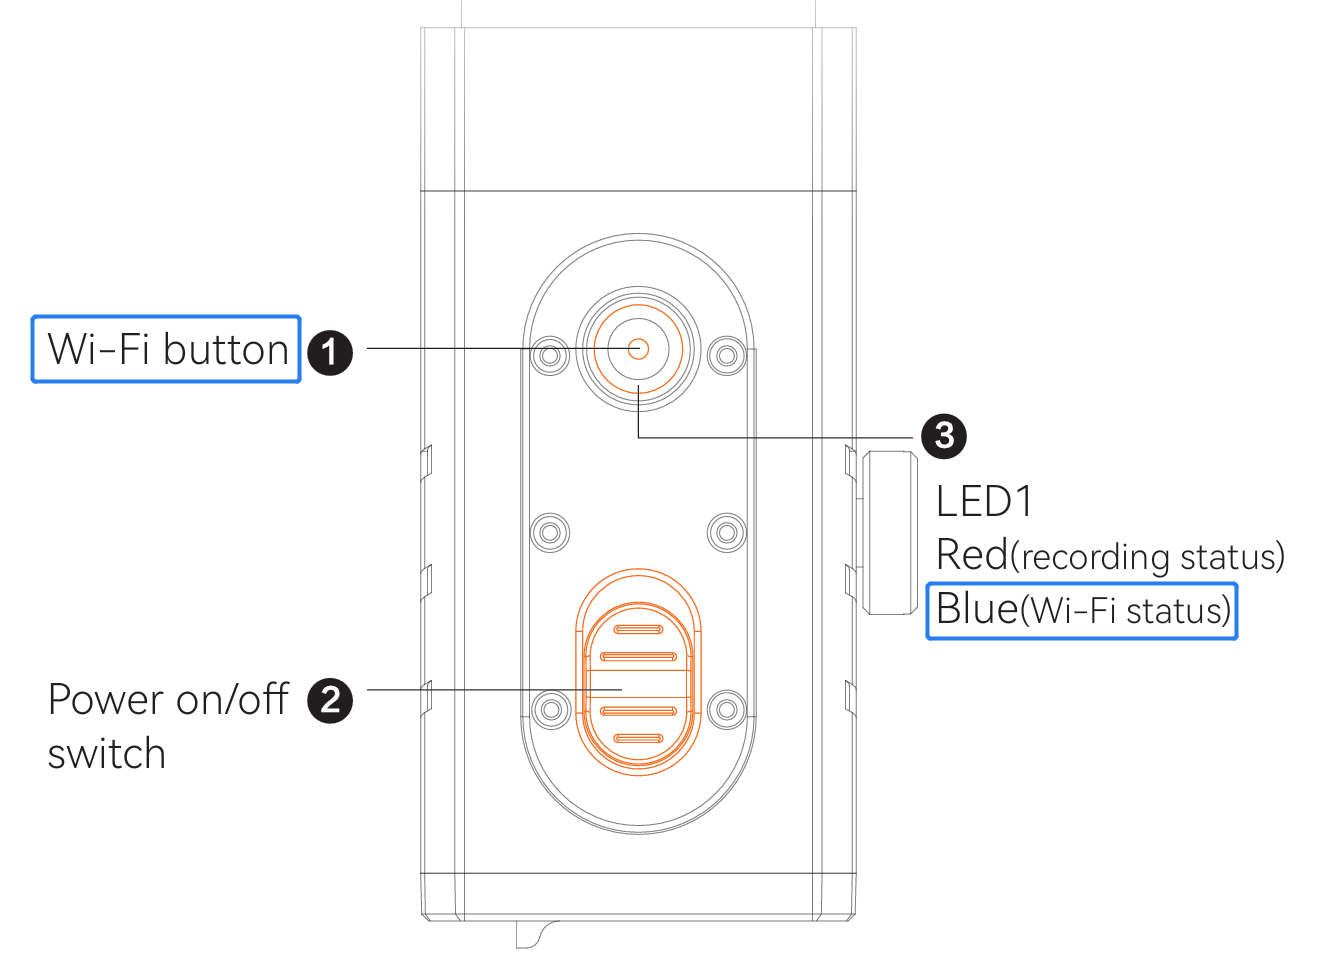
-If the camera is powered off , press and hold the Wi-Fi button for 3 seconds. The camera will power on, and Wi-Fi will be enabled automatically.

-If the camera is already powered on , press and hold the Wi-Fi button for 3 seconds to enable Wi-Fi. A blue blinking light on the Wi-Fi button indicates that Wi-Fi is active.

image.png

Step 2: Connect to Camera Wi-Fi on Mobile Device

-Open the Wi-Fi setting of the phone

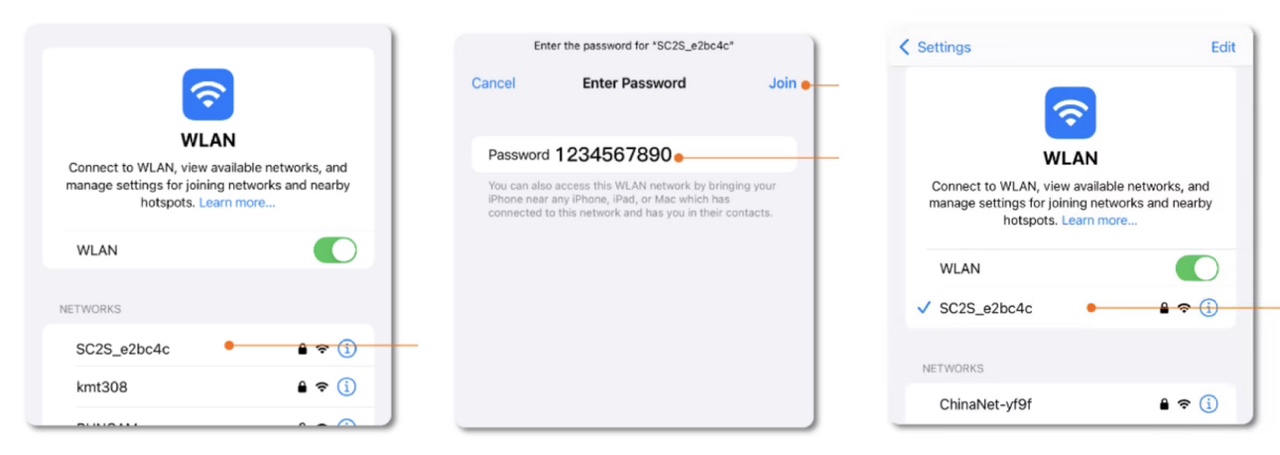
-Look for the camera’s Wi-Fi network. The network name begins with SC2S.

-Enter password to connect/join. Default Wi-Fi password: 1234567890

-Once connected successfully, the Wi-Fi button’s light will turn solid blue.

Wi-Fi connection.JPG

Step 3: Connect via RunCam App.

-Open RunCam App. Allow required permissions such as local network and location access when prompted.

-Tap the camera icon in the app to initiate the connection.

-Once connected, the app will display a live preview and provide access to detailed camera settings.

PRODUCT FAQ

ScopeCam 2 4K

App connection, mounting, startup recovery and Flashback guidance.

How to connect a ScopeCam 2 4K to app?

The ScopeCam 2 4K can connect to the RunCam Legacy app on mobile devices via Wi-Fi .


How to Enable Wi-Fi on the ScopeCam 2 4K

There are two ways to enable Wi-Fi:

  1. Power-on with Wi-Fi button
    Press and hold the Wi-Fi button only to power on the camera. Wi-Fi will be enabled automatically.
  2. Enable Wi-Fi after power-on
    Power on the camera first, then press and hold the Wi-Fi button until the camera responds. Wi-Fi will be enabled shortly.

Wi-Fi Indicator Status

Once Wi-Fi is enabled:

  • microSD card inserted:
    The Wi-Fi button light will blink purple and red alternately .
  • microSD card not detected / SD card issue:
    The light will blink blue, red, and purple alternately , indicating both Wi-Fi standby and an SD card issue.

Connecting to the Camera

  • Open the Wi-Fi settings on your mobile device.
  • Locate and connect to the camera’s Wi-Fi network.
  • Default Wi-Fi password:
    1234567890
  • After connecting to Wi-Fi, open the app ( RunCam Legacy ) and select the correct camera model to proceed.

Important: App Compatibility

There are two RunCam apps available:

  • RunCam App (Orange icon) – newly released, for newer camera models
  • RunCam Legacy (White icon) – previously named RunCam App

⚠️ ScopeCam 2 4K is only compatible with RunCam Legacy (White icon). Our digital manuals will be updated accordingly to reflect this change.

RunCam Legacy Download Links


Connection Tips (Recommended)

When connecting a RunCam camera to RunCam Legacy , we recommend:

  • Disabling mobile data / cellular service
  • Turning off any VPN
  • Allowing the app access to your phone’s location and local network

These steps help ensure the video feed displays properly.

If you have any questions or encounter any issues, please feel free to contact us.

How can I get a normal (horizontal) recording if the camera is mounted sideways or upside down?

With the default picatinny rail adapter, ScopeCam 2, ScopeCam 2S and ScopeCam 2 4K supports different mounting positions:

① On the side

② On the top

③ Underneath

Mounting Position.png

When mounting the camera on the side of airsoft gun, rotating the lens module can help obtain a normal/horizontal recording view.

Demonstration video:

When disassembling and reassembling, please handle the cable with care to avoid any potential damage.

What to do if ScopeCam 2/ScopeCam 2 4K only has a solid red light with vibration after powering on?

With a microSD card inserted in, ScopeCam 2/ScopeCam 2 4K will record normally after powering on, and the light on both Wi-Fi button and charging indicator will be slowly blinking red.

If the camera doesn't record after powering on, and it only has solid red lights on both Wi-Fi button and charging indicator, please follow the steps below to check and solve the problem.

(Notice: the light on Wi-Fi button may be fast flashing purple after staying on red for a while)

gif.GIF

It is possible for the camera to respond abnormally when it has a program error, or it cannot detect a lens module, and we recommend checking the connecting cable inside.

Here are the steps to reset the camera:

(1) slide the switch to "off"

(2) long press the Wi-Fi button only to power off the camera

(3) long press the Wi-Fi button again to power on the camera

Please check if the response of camera differs after resetting.

Here are the steps to check the lens module:

(1) remove the outer lens tube/casing

Check the lens Pic1.JPG

(2) remove the screws around the lens (4 in total)

Check Sensor Pic 1.JPG

(3) check the connecting cable inside to see if it gets connected properly, and check if each wire looks good

IMG_9328.heic.JPG

If the cable gets damaged, you can reach out to our product support to purchase a cable replacement.

Email: run@runcam.com

What to do if ScopeCam 2 4K could not be turned on after updating firmware?

If ScopeCam 2 4K seems bricked after updating firmware, please try to solve it by referring to the following steps:

  1. Format the used micro-SD card to exFAT or FAT 32 (Samsung U3 card highly recommended) Samsung_recommended_card.png
  2. Download and copy the SC024K.BRN file to card directly, without putting it into any folder
  3. Charge the camera for at least half an hour (green led should be on)
  4. With SD card inserted, power the camera via USB cable and a mobile charger, long pressing the Wi-Fi button for about 20 seconds till it gets turned on

SC24K_WIFIBUTTON.png

How to use the flashback cable of ScopeCam 2 4K?

ScopeCam 2 4K has the flashback function, and using the flashback cable could help shoot moments. 1.png

It could be regarded as a capturing function, and this article is telling how to capture via using the flashback cable.

Note: Flashback function is only available when using the flashback cable to control.

To have flashback videos, there are 2 things to be confirmed before shooting:

1.Firmware of Camera

Please make sure that the firmware of ScopeCam 2 4K is at least V1.0.6 . Otherwise, the camera will not record the flashback videos.

Note: Latest firmware version is V1.1.0 (updated in 2025)

Here is the link for updating firmware via SD card. Please make sure the firmware file is to be copied to the SD card directly without being put into any folder or changed the file name. Camera will detect the firmware for updating automatically.

https://www.runcam.com/download/scopecam24k

2.Flashback function

The Flashback function needs to be turned on before using because it is turned off by default.

For turning on, connecting the camera to RunCam App via Wi-Fi, and then go to detailed settings to turn on the flashback function.

2.png 1.PNG 2.PNG

For moment capturing, the flashback video contains 2 parts: one part is recorded before pressing the button of cable, and the other part is recorded after pressing.

Here are the details of recording time for flashback videos:

Resolution 1080P@50FPS 1080P@60FPS 1080P@100FPS 1080P@120FPS 2.7K@60FPS 4K@30FPS
Former recording time 15 seconds 15 seconds 10 seconds 10 seconds 5 seconds 3 seconds
Latter recording time 15 seconds 15 seconds 15 seconds 15 seconds 15 seconds 15 seconds
Total recording time 30 seconds 30 seconds 25 seconds 25 seconds 20 seconds 18 seconds

When the flashback function is turned on via RunCam App, you need to select a proper resolution. After powering on ScopeCam 2 4K, camera won't start recording by default, and please use the flashback cable with the camera. Press the button on the flashback cable, the camera will start recording.

Without turning on flashback function, the flashback-cable could be used as a switch to control recording. It means that user could start and stop recording at any time by pressing the button of flashback cable.

PRODUCT FAQ

Helmet Camera 4K

RunCam Legacy Wi-Fi connection guidance for Helmet Camera 4K.

How to connect Helmet Camera 4K to RunCam Legacy App via Wi-Fi?

Both Helmet Camera (1080P) and Helmet Camera 4K should us RunCam Legacy app for a connection, and the operation steps and default Wi-Fi password are the same.

Please refer to: How to connect Helmet Camera to RunCam Legacy App via Wi-Fi?

If there are any questions or problems with the connection on Helmet Camera 4K, please contact us by sending an email to run@runcam.com , we will help as soon as possible.

PRODUCT FAQ

Thumb 2

Power-supply troubleshooting for Thumb 2.

What to do if Thumb 2 only has flashing green light after powering up?

Thumb series requires a stable 5V or USB power supply.

Please check the applied power supply for the Thumb 2.

For a power supply from FC, please use a multimeter to measure and check the powering voltage for confirmation.

For an external USB power supply, please use a USB-A to USB-C cable with a regular phone charger or power bank to try powering on Thumb 2 camera again, as it is possible for a computer or a laptop to cut power for the camera.

If the issue remains, please send an email to run@runcam.com . For faster help, please provide us with photos/video demonstrating the issue.

PRODUCT FAQ

Thumb Pro W

Firmware-update and recovery guidance for Thumb Pro W.

What to do if my Thumb Pro W (V2 new version) could not update the firmware?

Firmware updating may fail under these cases:
(1) Incorrect firmware file
(2) Power supply
(3) SD card issue

If Thumb Pro W (V2 new version) failed to update the firmware, please follow the steps to solve.

Step 1: Check if the firmware file is correct
Thumb Pro has 2 versions: V1 and W (V2), and they use different firmware.

___.jpg
So, user needs to download and copy the correct file to SD card to proceed updating.

For Thumb Pro W (V2 new version)
Link for downloading: https://runcam.com/download/ThumbProW
Previous firmware versions: V1.0.2 / 1.0.3
The latest firmware is V1.0.4

Step 2: Use a card with great reading and writing speed
Camera has limited compatibility with SD cards.
We highly recommend using Thumb Pro cameras with Samsung U3 card for the better compatibility and speed.

Samsung_recommended_card.png

User could also format the card before updating firmware.

(Notice: please backup everything before formatting if necessary)

Here is a formatter that may help to get the best performance of SD card:

https://www.sdcard.org/downloads/formatter/

Step 3: Check the position of firmware file

File should be placed at the root directory of the SD card (first grade).

Please copy the firmware to SD card directly , without putting it into any folder.

Otherwise, it is unavailable for the camera to detect the firmware file to proceed updating.

____.png

Step 4: Check the power supply

To update the firmware, it is highly recommended to power the camera via USB cable with a mobile charger or a power bank.

If powering via FC, please make sure the voltage is 5V strictly in case power surge.

(Attention: connecting to computer/laptop is unavailable for updating)

Green led would blink while updating, which may take about 2-3 minutes. After updating, the camera would shut off automatically.

*Please do not cut off the power during updating

If sir still has any question or problems, please send an email to run@runcam.com with providing a demo video of problem, photos of camera and used SD card and invoice.

We would help and solve as soon as possible.

How to flash Thumb Pro-W(NEW VERSION-BIGGER FOV) via computer when it could not be turned on?

1.Download the icatch and "download" files first, unzip and install the driver. (They could be found at the bottom of this article)

2.Then, disassemble the camera, and hook up the microUSB connector of the USB cable to the camera but don't plug the USB-A side to the computer;
Use a pair of metal tweezers to make the 2 pins short-circuited, and keeping them being shorted, plug the USB-A connector to the computer;

Thumb_Pro_W_Pads.JPG

mceclip0.png

3. Check the device manager on the computer. Under USB Controllers, if there are two icatch entries , it means that the camera gets detected by the computer successfully, and you could remove the tweezers to release the short, and move to the next step;
mceclip0.png

If there are no icatch devices displayed, it means that the computer does not detect and the short-circuiting is not successful.

Ensure that the used USB cable supports both powering and data transfer. Please unplug the USB cable from the computer, short the pins again and re-plug the USB-A into the computer.
It may need to try several times to make it short-circuited successfully.

4. When you succeed in making it detected, go to the " Download" file folder that you
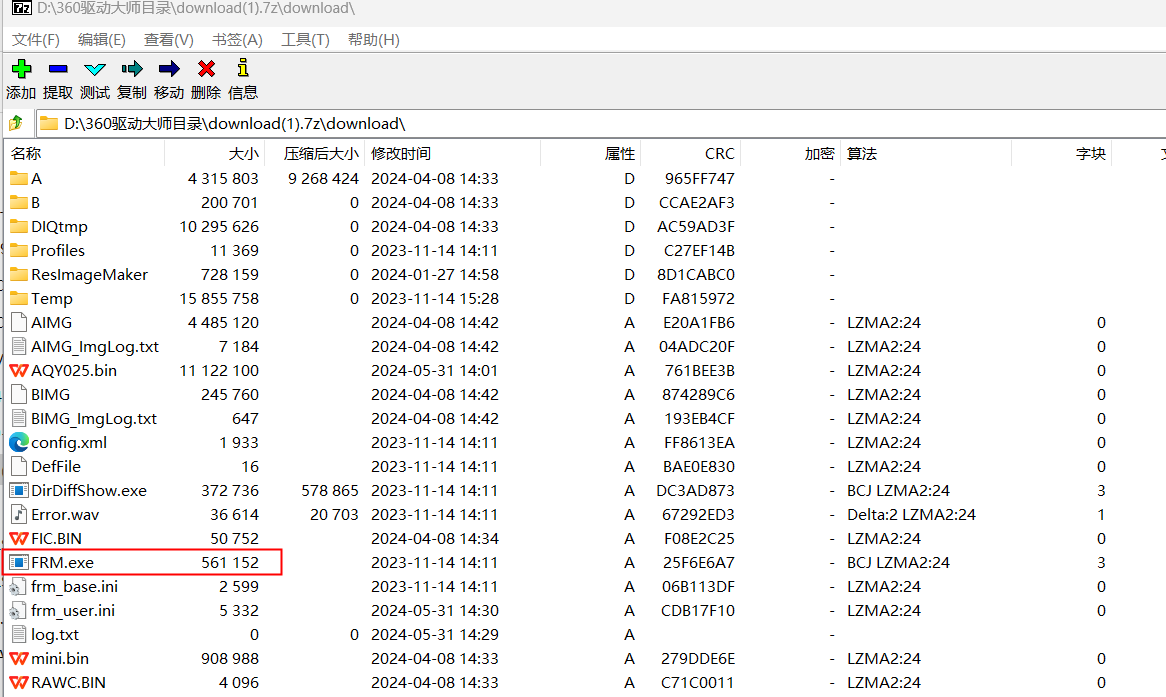
unzipped earlier, run FRM.exe program.
mceclip1.png

5. Click " ISP " on the right side of the right portion.
Program will ask you to confirm, and please click “yes” to proceed.

mceclip2.png

Let the program run till it says finished.

mceclip3.png

https://youtu.be/_92s1qVkvVo

PRODUCT FAQ

RunCam 6

Type-C power behavior and computer-based firmware recovery.

How to fix RunCam 6's abnormal responses when powered via a Type-C cable?

When powering the RunCam 6 via a Type-C cable without using the internal battery, the camera may randomly pause or switch modes if the cable is moved.

To resolve these abnormal behaviors, there are two possible solutions:

  1. Shorten the cable to reduce movement.
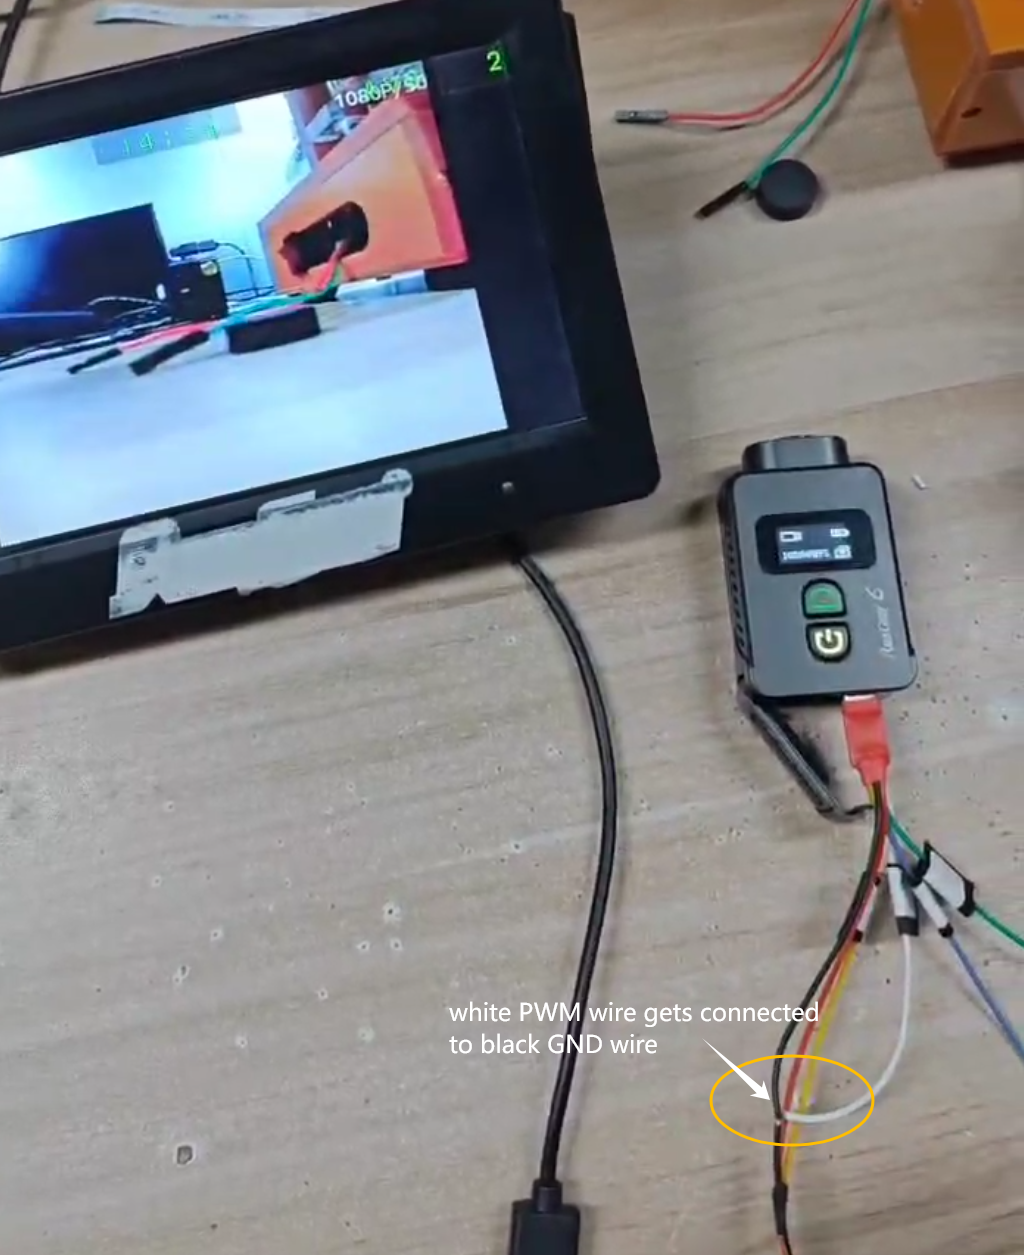
  2. Connect the white PWM wire to the black ground (GND) wire.

Here is a demo video showing the camera functioning normally after connecting the white PWM wire to the black GND wire:

https://drive.google.com/file/d/1E-EE2wzVoXEl7YvmKnX4QZ7OW0FC1Nn8/view?usp=sharing

Flashing firmware of RunCam 6 via computer

When RunCam 6 doesn't work properly, please try flashing the firmware via computer when the card method doesn't work.

Please try the steps below to flash the firmware via computer, and please remove a microSD card and battery from the camera before flashing the firmware.

1.Install icatch drive to computer or laptop https://runcam.zendesk.com/attachments/token/vDErTSW4RgCokgRQ3DNHTxASA/?name=icatch_v3000_For_V37_V50_V35_V33_K33.7z

Download the attached runcam6-f.7z , and extract to get the download folder. (Find this at the last part of this article)


2. Keeping press the WiFi button of RunCam 6, use a USB-C cable to connect it to a computer.

Green light will be on at the power/shutter button, and the display screen will not be on at this time.

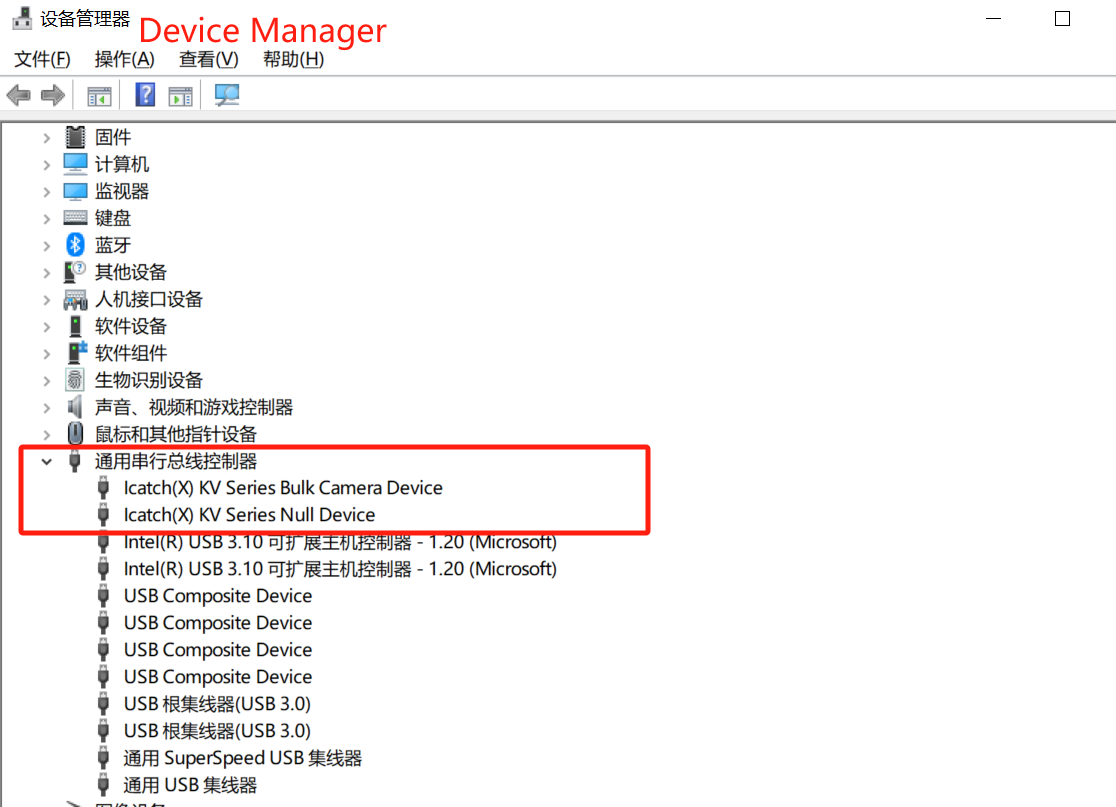
You can confirm a successful detection when seeing two icatch devices at Device Manager:

3. Go to the download folder from runcam6-f.7z, and click FRM.exe to proceed with flashing.

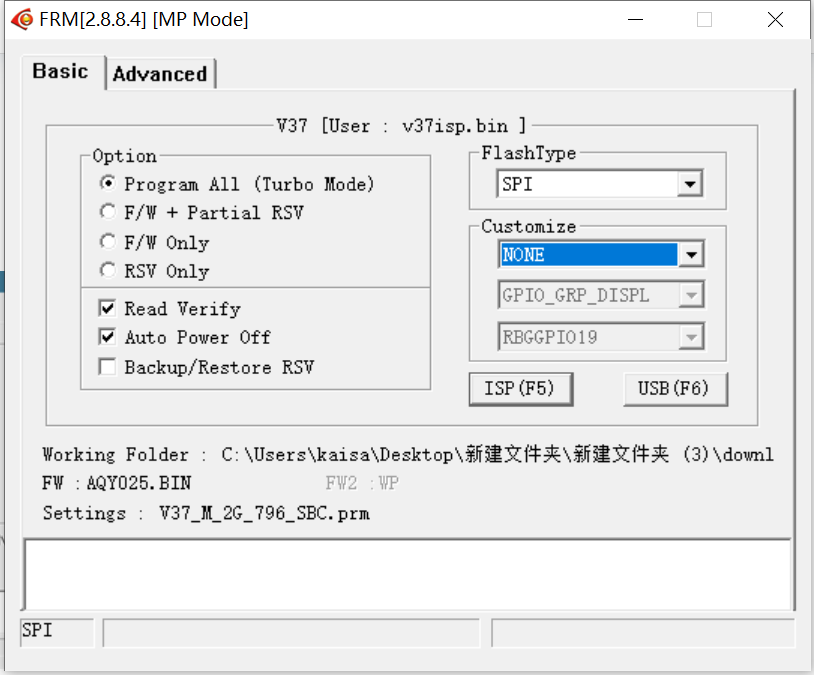
Please follow the options selected in the picture below, and then click ISP(F5) to start.

It will take about 2 to 3 minutes for the camera to finish the flashing.

PRODUCT FAQ

RunCam 5 Orange

App setup, firmware recovery, product differences and startup troubleshooting.

What to do if RunCam 5 Black/Orange could not scan the QR code at App?

Camera may fail to scan the code under these cases:

(1) Incorrect selected camera model

(2) Not enough brightness and distance

(3) Focusing issue

If RunCam 5 Orange/Black failed to scan the code, please follow the steps to solve.

Step 1: Check the selected camera model

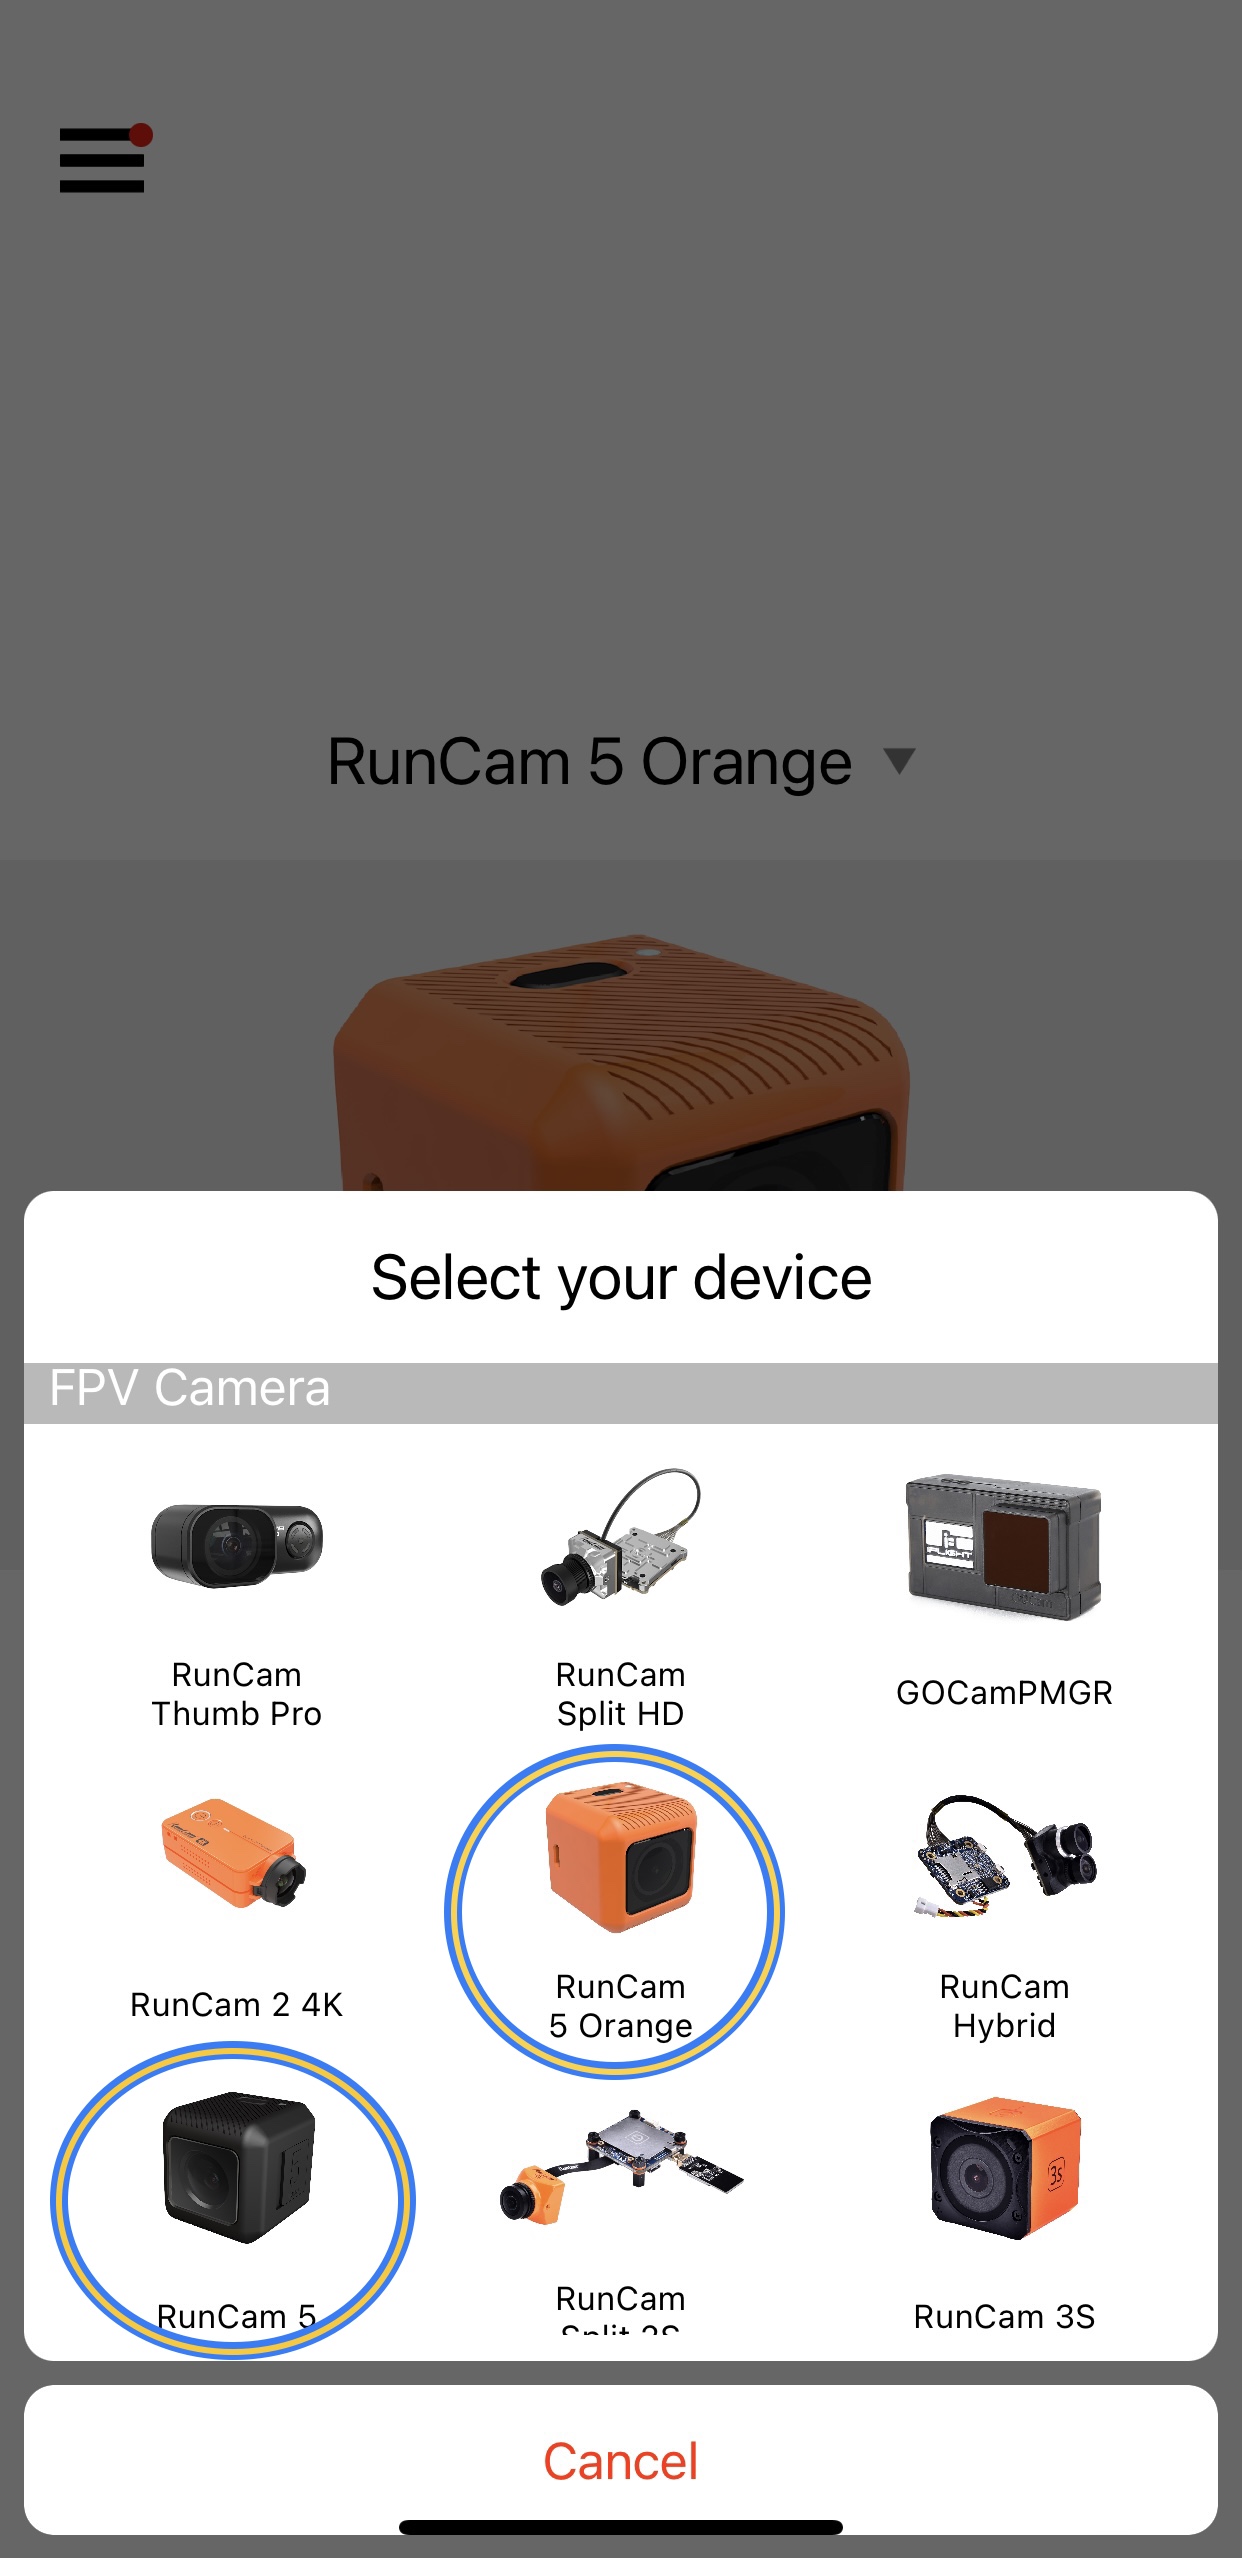
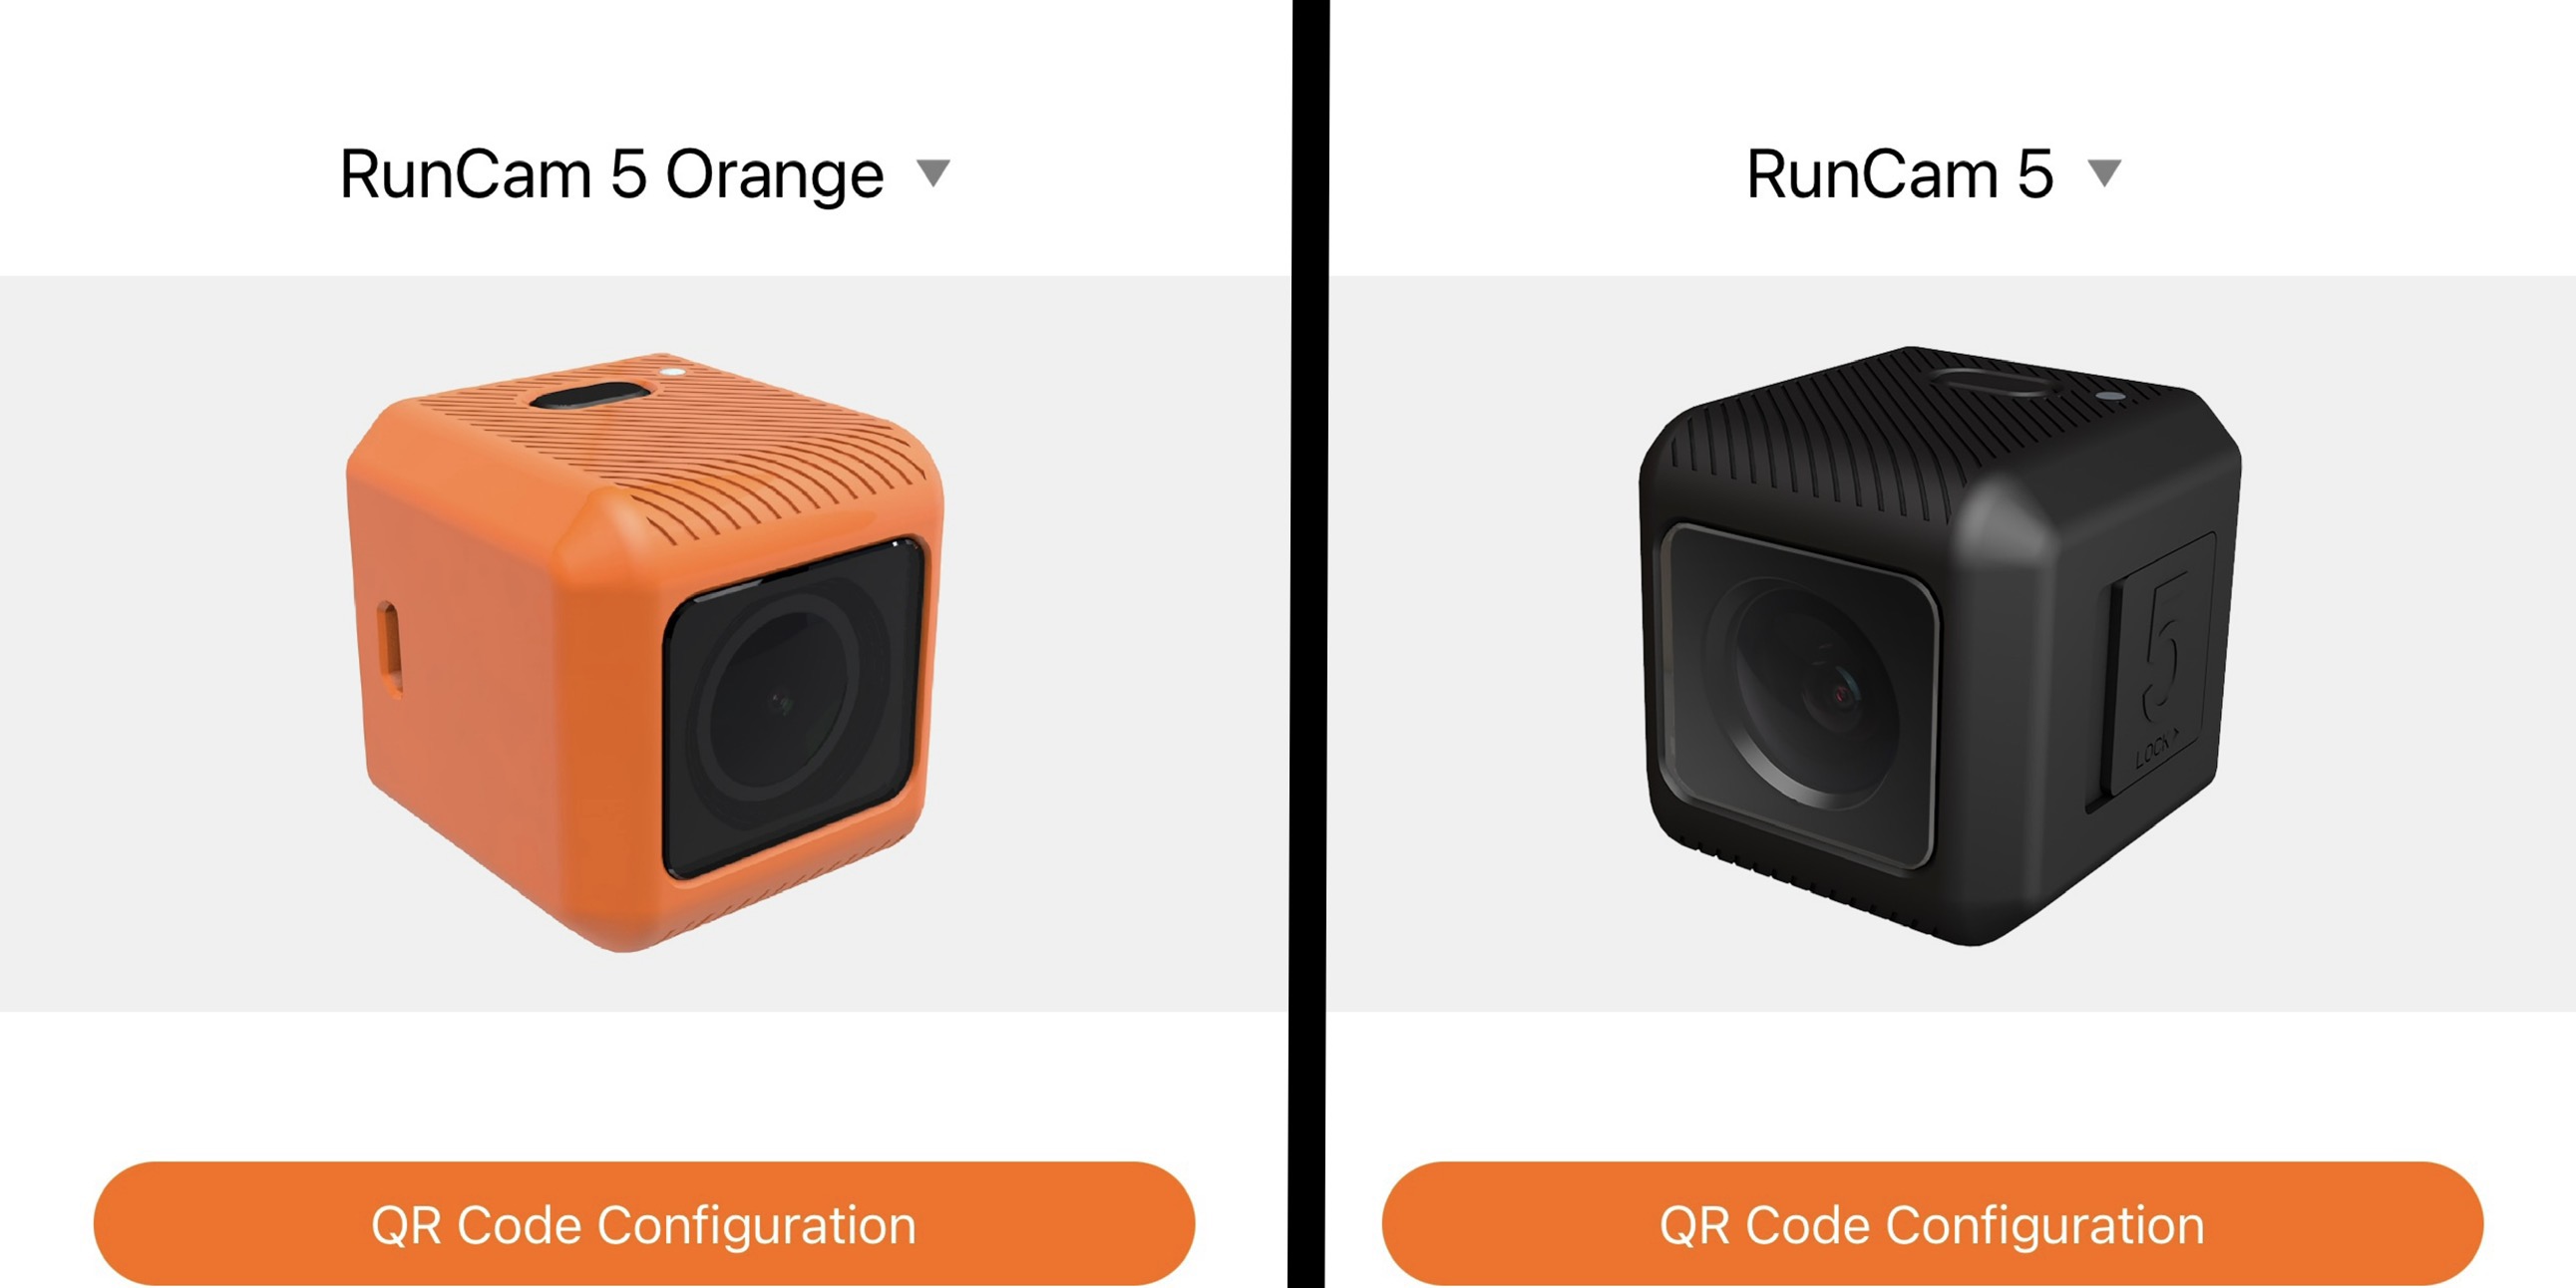
There are 2 RunCam 5 models at RunCam App.

aPP_1.PNG models_pic.JPG

The black one is a previous version, which has been discontinued.

RunCam 5 Orange is an updated version, and the black color option has been available this year.

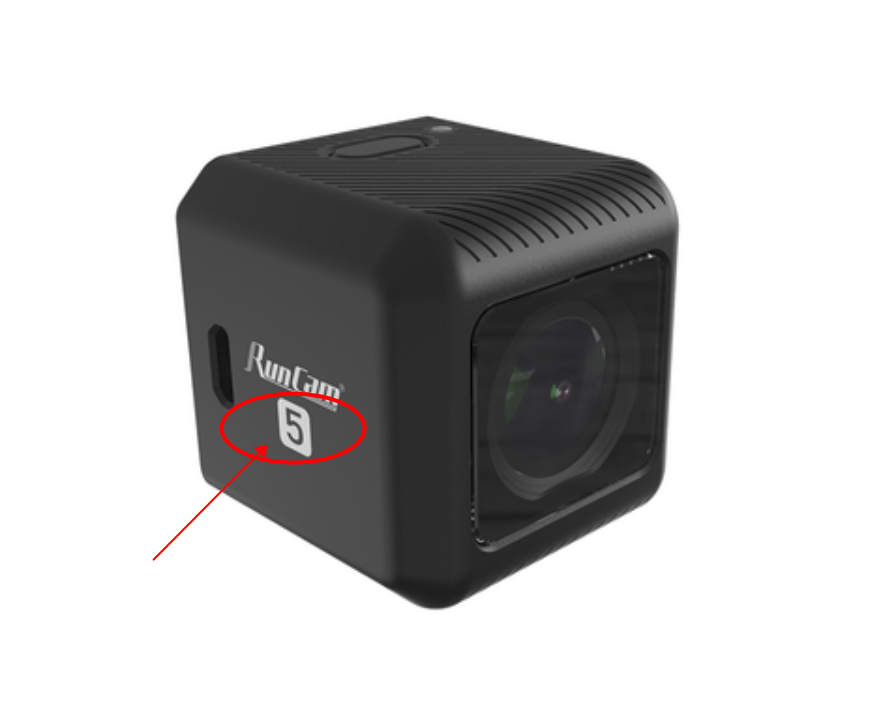
If your RunCam 5 Black has a number ”5” under the RunCam print, please select RunCam 5 Orange to proceed setting.

runcam_5_orange_-_black.png

Step 2: Check brightness and distance

Please make sure the screen is bright enough for scanning, and keep the distance between camera and screen at least 5cm. User could also the camera to move a little bit if It doesn’t recognize the code.

Step 3: Check camera focusing

If the camera could not focus well, it is possible that scanning would be unavailable.

User could use the camera to record and check its footage.

Or connect it to the computer/laptop via a USB cable, using RunCam 5 Orange/Black as a webcam to check the focusing. For using as a webcam, please press the button after connecting, the computer/laptop would recognize it.

If the camera still has scanning or focusing issue, please send an email to run@runcam.com with providing a demo video or a footage clip, clear photos of camera from angles and invoice.

We would check and confirm, advicing as soon as possible.

Firmware Flashing via computer when RunCam 5 orange cannot work.

Please follow the steps below to flash the firmware of camera via a computer:

It can be done when the camera is turned off, and please remove a microSD card from the camera before flashing.

1.Dowloand and install this drive to your computer: https://runcam.zendesk.com/attachments/token/vDErTSW4RgCokgRQ3DNHTxASA/?name=icatch_v3000_For_V37_V50_V35_V33_K33.7z
2.Take a USB cable, plug the microUSB connector to the camera first.

Keeping pressing the reset button on the camera, plug the USB-A connector to the computer USB port. When you see two devices listed in device manager as showed below, a recognition is successful.

Otherwise, please repeat the operations to connect again.
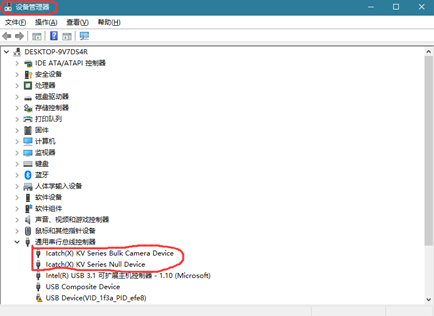
​
3. Download and extract the attachment file downloadV1.2.3.zip.

Find FRM program and execute it.

Select the settings et as we showed in below screenshot and click ISP to start flashing.

It will take a few minutes to flash.

When the program displays "ISP finished", the firmware flashing is completed.

4.If it appears that like "Program All Error!" please disconnect the camera from your computer, and repeat the steps to try flashing again.

Here is a demo video for reference: https://youtu.be/4VdDv0KvTCk

Are there any differences from RunCam5 black (old version) and current RunCam5 Orange?

In a word, the RunCam 5 Orange is an updated version of the RunCam 5.

Specifically, there are the following improvements:


1. Added a new resolution: 2.7K 60fps. The original RunCam 5 can only support 2.7K 50fps.


2. Added a new EIS(Electronic Image Stabilization) chipset. The original RunCam 5 doesn't have an EIS feature, and RunCam 5 Orange supports Gyroflow.


3. The recording time increases by more than 30%. Especially for the 4K 30fps resolution, the RunCam 5 Orange can record up to 105 minutes while the original RunCam 5 can only record for about 65 minutes.

What to do if Runcam5 orange cannot be turned on?

It is a bug of the firmware which can be fixed.

You need to do two steps:

1. Reset the camera:  Please hold the power button and don't release and then hold the reset button beside the SD card slot.  Then please release the reset button first and later the power button.

2. Turn on the camera and update the firmware: https://www.runcam.com/download/runcam5or

Please refer to the link

https://www.youtube.com/watch?v=peUWm4SPVUA

TOPIC 03

Orders & Shipping

Tracking, delivery updates and shipment concerns.

Where can I find my tracking information?

Check the shipping confirmation sent to the email address used for the order. Tracking may take some time to update after the label is created. If no tracking information appears, contact support with your order number.

What should I do if the parcel is delayed or arrives damaged?

Keep the shipping label and packaging, photograph any visible damage and contact support. For a delay, provide the order number and latest tracking status so the shipment can be reviewed.

How long does order processing take?

Orders are typically processed within 3 business days after placement.

Weekends and public holidays are not counted as business days.

After shipment, delivery time depends on the selected shipping method, destination, local customs clearance, and last-mile delivery conditions.

For more details on shipping methods, please refer to our Shipping Policy .

Can I change my shipping address after placing an order?

Please contact us as soon as possible if the shipping address needs to be changed.

If warehouse processing has not yet started, we may still be able to update the address. Once the package has been prepared or shipped, the address may no longer be changeable by RunCam.

After shipment, the recipient may need to contact the local last-mile carrier directly to check whether a delivery adjustment is possible.

Please ensure that the shipping address is complete and accurate when placing your order.

What should I do if my order is marked as delivered but I have not received it?

If the tracking status shows “Delivered” but the package has not been received, please first check your mailbox, building reception, neighbors, safe-place locations, or local pickup points according to the tracking information.

If the package still cannot be located, please contact your local last-mile carrier for delivery verification and then contact our customer service team with the available information.

Once the shipment enters last-mile delivery, the local carrier is responsible for final delivery and we may no longer be able to directly change the delivery process.

Why does my order still show “Confirmed” or “Unfulfilled”?

“Confirmed” means that the order has been successfully created, while “Unfulfilled” means that the items have not yet been shipped.

These statuses can remain visible while the order is waiting to be processed or prepared by our warehouse.

If any payment-related action is required from you, our customer service team will contact you separately.

Why has my tracking information not updated?

Tracking information may not update immediately after shipment.

For international orders, there may be periods with limited tracking scans while the package is moving between countries, undergoing customs processing, or waiting to be handed over to the local carrier.

Please check 17TRACK and the local carrier's tracking website when available.

If there is no meaningful update for an extended period, please contact our customer support team and we will assist with the latest available information.

Can I change or cancel my order?

Order changes or cancellations depend on the actual processing status of your order.

The status shown in your account may not always indicate whether warehouse packing has already started, so please contact us as soon as possible if you need to make a change.

Under “Confirmed” or “Unfulfilled”

Order changes or cancellations may still be possible at this stage.

However, if the warehouse has already started preparing or packing the order, we cannot guarantee that the change or cancellation can be completed.

If assistance is needed, please contact our customer service team as soon as possible.

Under “Fulfilled” / Shipped

Once the order has been fulfilled and shipped, no changes or cancellations can be made, as the package is already in transit.

If a delivery adjustment is required after shipment, the recipient may need to contact the local carrier directly, depending on the carrier's policy.

TOPIC 04

Payment & Checkout

Payment status, checkout and order confirmation.

What should I do if my payment cannot be completed?

Please ensure that your card or PayPal account has sufficient funds, your payment information is entered correctly, and your internet connection is stable.

If the issue persists, please contact our support team and we will be happy to assist you.

What should I do if I have not received my order confirmation?

Order confirmation emails are usually sent after payment has been successfully received and the order has been created.

If you have not received an order confirmation email, please check your spam or junk folder first.

If you still cannot find the confirmation email, your payment may still be processing, or the email address entered during checkout may be incorrect. Please contact our support team for confirmation.

How will I receive my refund if my order is canceled?

If an order is successfully cancelled before shipment, the refund will be issued to the original payment method immediately after the cancellation is completed.

Although the refund is initiated immediately by RunCam, it may take approximately 2–5 business days for the funds to appear in the customer’s account, depending on the processing time of the customer’s card issuer, bank, or payment provider.

What should I do if I have not received an order confirmation and would like to cancel the payment?

If you have not received an order confirmation and would like to stop or cancel a pending payment, please contact your bank or payment provider first.

In some cases, the payment may still be pending or has not yet been received by RunCam. In such cases, we may not be able to cancel or refund the transaction directly until the payment status is confirmed.

You are also welcome to contact our support team so that we can help check the order status from our side.

TOPIC 05

Product Use & Electronics Basics

Safe everyday handling of cameras, batteries and storage media.

What should I check before powering an electronic camera?

Confirm the supported input voltage, connector orientation and polarity. Use a suitable power source and inspect cables for damage. Stop immediately if the product becomes unusually hot, smells abnormal or shows visible damage.

How should I prepare and maintain a microSD card?

Use a card that meets the product’s stated speed and capacity requirements. Back up important files before formatting, format the card using the required file system and avoid removing power or the card while data is being written.

Still need help?

Send the support team your camera model, firmware version and a description of the indicator lights.

Contact Support

Search